• 1. London, UK
  • 2. New York, NY
  • 3. Sydney, Australia
  • 4. Melbourne, Australia
  • 5. Moscow, Russia
  • 6. Singapore
  • 7. Paris, France
  • 8. Chicago, IL
  • 9. Hong Kong
  • 10. Houston, TX
Bharat Suneja

Monday, November 16, 2009


Bulk mailbox creation: Import passwords from a file

Posted by Bharat Suneja at 10:09 AM
Automating bulk mailbox creation required fairly advanced scripting skills in Exchange 2003/2000. Thanks to the Exchange Management Shell (aka "the shell") in Exchange 2010 and 2007, this task is greatly simplified. It doesn't require any advanced scripting skills and it can be accomplished by relative newcomers to Exchange Server with very little knowledge of the shell.

Exchange Server 2007: Bulk creation of mailboxes using Exchange Management Shell shows you how to create bulk mailboxes using user data imported from a CSV file. A related post— Bulk mailbox creation revisited: Adding Active Directory attributes shows you how additional Active Directory attributes not included in the New-Mailbox/Set-Mailbox cmdlets can be populated.

When creating mailboxes using the New-Mailbox cmdlet, Exchange Shell requires the password to be of type System.Security.SecureString, derived from the SecureString class in the dot net framework. In the example in Exchange Server 2007: Bulk creation of mailboxes using Exchange Management Shell, we use the same password for all accounts. We also prompt the admin to enter that password using the Read-Host cmdlet, as shown below:

$Password=Read-Host "Enter Password" -AsSecureString

When the admin running the command or script enters the password, powershell masks the password by displaying a * for each character entered.

One frequently asked question when discussing bulk mailbox creation is: how do I import passwords from a text file? Of course, saving passwords in a text file isn't very secure, but there may be cases where you need to do this temporarily— particularly when you want to create mailboxes/user accounts in bulk and don't want to assign the same password to all accounts. When doing so, it's recommend to set the account to change password on next logon. There may also be other scenarios where you need to import passwords from a text file, so I'll leave the security aspect of this up to you.

The first step to importing passwords from the text file is to add it as an additional column or field in the file. For example:

Alias,Name,UPN,Password
User_One,User One,[email protected],P@ssw0rd1
User_Two,User Two,[email protected],P@ssw0rd2
User_Three,User Three,[email protected],P@ssw0rd3

If you try to use the same command as shown in the previous post, and simply add the parameter -password and the value $_.password in the code block, it'll fail.

Import-CSV CreateRecipients.csv | foreach {new-mailbox -alias $_.alias -name $_.name -userPrincipalName $_.UPN -database "Mailbox Database" -org Users -Password $_.password}
Cannot process argument transformation on parameter 'Password'. Cannot convert the "P@ssw0rd1" value of type "System.String" to type "System.Security.SecureString".
+ CategoryInfo : InvalidData: (:) [New-Mailbox], ParameterBindin...mationException
+ FullyQualifiedErrorId : ParameterArgumentTransformationError,New-Mailbox

Converting a string to a SecureString
To use the password field imported from the CSV file, you must first convert it to a SecureString. You can convert a string to a SecureString using the ConvertTo-SecureString cmdlet. When using the ConvertTo-SecureString cmdlet, you must specify that the source string is provided as cleartext by using the AsPlainText switch (not to be confused with the plaintext message format). The cmdlet also requires that you specify the Force switch to confirm you really want to do this— yes, you've just provided your consent to convert a plaintext string to a SecureString!

The modified command looks something like this:

Import-CSV CreateRecipients.csv | foreach {New-Mailbox -Alias $_.alias -Name $_.name -UserPrincipalName $_.UPN -Database "Mailbox Database" -Org Users -Password (ConvertTo-SecureString $_.password -AsPlainText -Force)}

To enforce a password change on next logon, add the ResetPasswordOnNextLogon parameter to the command:

Import-CSV CreateRecipients.csv | foreach {New-Mailbox -Alias $_.alias -Name $_.name -UserPrincipalName $_.UPN -Database "Mailbox Database" -Org Users -Password (ConvertTo-SecureString $_.password -AsPlainText -Force) -ResetPasswordOnNextLogon $true}

Labels: , , , ,

Tuesday, September 15, 2009


Export and Import Content Filter Words or Phrases

Posted by Bharat Suneja at 9:26 AM
In Exchange 2010 and Exchange 2007, you can add custom words or phrases as good or bad words to modify the Spam Confidence Level (SCL) assigned to messages. Messages with a good word or phrase are assigned an SCL of 0 and bypass other antispam agents that fire after the Content Filtering agent. Messages with a bad word are assigned an SCL of 9, and any configured action (delete/reject/quarantine) is taken based on the Content Filtering configuration.


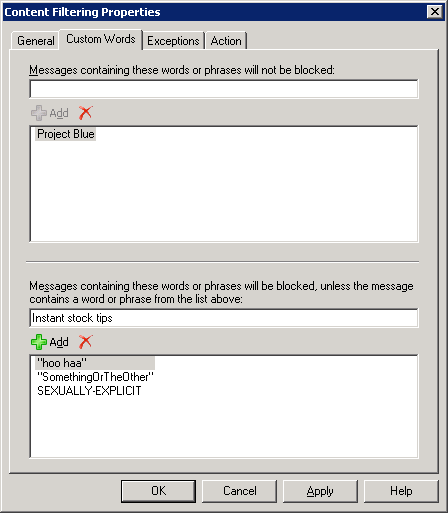
Figure 1: Adding a custom word or phrase to Content Filtering configuration

To add a good or bad phrase to the custom words list using the EMC:
  1. Go to Organization Configuration | Hub Transport | Anti-spam tab
  2. Select Content Filtering and click Properties in the action pane
  3. In Content Filtering Properties, select the Custom Words tab
  4. Add a word or phrase in the following fields as required:
    • Messages containing these words or phrases will not be blocked:To add a good word or phrase, type it in this field
    • Messages containing these words or phrases will be blocked, unless the message contains a word or phrase from the list above: To add a bad word or phrase, type it in this field.

To add a word or phrase using the shell, besides the actual word or phrase, you must also specify the influence:

Add-ContentFilterPhrase "bad word" -Influence Badword

You can get a list of words or phrases added to Exchange by using the Get-ContentFilterPhrase cmdlet:

Get-ContentFilterPhrase | Select phrase,influence


Exporting and Importing Custom Words and Phrases
On the Edge Transport server, configuration information is stored in the local instance of Active Directory Application Mode (ADAM) on Windows Server 2003. In Windows Server 2008, ADAM is renamed to Active Directory Lightweight Directory Service (ADLDS). Unlike Exchange Server configuration information stored in Active Directory, which is replicated to all domain controllers in the AD forest, Edge Transport configuration information stored in ADAM/ADLDS is not replicated to other Edge Transport servers.

You can configure an Edge Transport server using a cloned configuration. See Using Edge Transport Server Cloned Configuration.

You can also export only the content filter phrases from one Edge Transport and import it to another Edge Transport server. To export the phrases, use the Get-ContentFilterPhrase cmdlet:

Get-ContentFilterPhrase | Select Phrase,Influence | Export-CSV "C:\MyFolder\CFPhrases.txt"

To import the phrases on another Edge Transport server, use the Add-ContentFilterPhrase cmdlet:

Import-Csv "C:\MyFolder\CFPhrases.txt" | foreach {Add-ContentFilterPhrase -Phrase $_.phrase -Influence $_.influence}

Labels: , , , , , , , ,

Friday, March 20, 2009


Released: PowerShell Snap-in For IIS 7

Posted by Bharat Suneja at 8:30 AM
The big news from MIX09 is probably the release of Internet Explorer 8, but for shell aficionados, Exchange folks and scripting geeks, the release of IIS Snap-in for Windows PowerShell is not a lesser event. The snap-in has 71 cmdlets to manage IIS, from web application pools to web site configurations, bindings, and SSL.

Download the IIS Snap-in for Windows PowerShell: X86 | x64.

For more information about the snap-in, head to IIS.net. IIS developer Sergei Antonov, who owns scripting and command-line tools, blogs here.

Curious to find out which cmdlets are included? Head over to the IIS 7 Cmdlets mini-reference.

Labels: , , ,

Thursday, February 19, 2009


Are Distribution Groups really being used?

Posted by Bharat Suneja at 8:00 AM
Over the years, you end up creating a large number of Distribution Groups based on user demands. The regular departmental Distribution Groups such as Sales, Marketing, Engineering, and HR. The geographical ones such as AllUS, All-California, All-BayArea, and so on. The ones by employment status such as All-FTE for full-time employees, All-Contractors, and so on. And ones to facilitate the working habits of executives and senior managers, who want to address their team with a distro (geekspeak for Distribution Group) like JoeSchmoe-DirectReports. Then there are the more interesting ones, such as All-MountainClimbers, All-GrungeFans.

Why are so many of these Distribution Groups prefixed with an All-? Can Distribution Groups ever be All-Whatever? Is it possible to include all grunge fans in the All-GrungeFans group? Or only the ones who confess? Can you guarantee everyone in the Sales dept will be included in the All-Sales group by default— even if you used Dynamic Distribution Groups? There will be times when someone does not populate the department attribute for the newly hired Manager of Inside Sales for Timbuktu, and surrounding areas. After two weeks in his exciting new inside sales position, the poor bloke finds out he hasn't received the number of sales leads freely flying around on the distro, and unfortunately won't be able to meet his targets for selling surfboards in Timbuktu that quarter.

Over the lifetime of Exchange deployments, there will be groups that get used more frequently, such as Send-Your-Jokes-Here-If-You-Have-Nothing-Better-To-Do-At-Work (the alias conveniently shortened to ExecTalk... ), or the ones that never get used, such as All-ExEmployees (hard as it is to believe, at least one of these two have been spotted in real-world deployments!).

One fine day, your friendly manager/auditor/HR person shows up at your desk wanting to know which distribution groups are in use.

That's where message tracking logs come to the rescue— assuming these are enabled. If you've been mucking around with these logs in Exchange 2007, you probably know a fair bit of PowerShell, and chances are you're absolutely loving it! If not, head over to previous post Exchange Server 2007: Message Tracking from the command line, and get to know the wonderful cmdlet Get-MessageTrackingLog.

Tracking messages sent to Distribution Groups
How do we get a list of messages sent to Distribution Groups? By getting a list of all Distribution Group expansion events, noted in message tracking logs with the EventID EXPAND. The RelatedRecipientAddress field in the EXPAND entry contains the PrimarySmtpAddress of the Distribution Group expanded. Use the following command to grab a list. You can restrain Get-MessageTrackingLog cmdlet in a number of ways. Since these have been covered in the previous post, I won't go into details here.

Get-MessageTrackingLog -Start 2/1/2009 -EventID Expand | ft Timestamp,RelatedRecipientAddress -Autosize

You get back a table that looks something like this:

Timestamp RelatedRecipientAddress
--------- -----------------------
2/18/2009 4:36:27 PM [email protected]
2/18/2009 4:41:18 PM [email protected]

Next, how do we determine how many messages each Distribution Group received? This is easily done by piping the results to the Group-Object cmdlet:

Get-MessageTrackingLog -Start 2/1/2009 -EventId Expand | group-object RelatedRecipientAddress | ft Name,Count -Autosize

This returns a count for each group of messages:

Name Count
---- -----
[email protected] 123
[email protected] 145

To list messages sent to a particular Distribution Group:

Get-MessageTrackingLog -EventID Expand | ? {$_.RelatedRecipientAddress -like "[email protected]"} | ft Timestamp,Sender,MessageSubject -Autosize

Of course, you could use the message tracking GUI in EMC— but would it rate anywhere close on your geek satisfaction index?

Labels: , , ,

Tuesday, February 03, 2009

You're testing Exchange 2007's Messaging Records Management (MRM) features to implement your organization's messaging retention policies.

You create a new Managed Folder for Calendar items, and then create a Managed Content Setting for it to expire Calendar items in 1 year. Next, you create a Managed Folder Mailbox Policy and add the Managed Folder to the Policy. You apply the policy to a test mailbox.

Testing the Managed Folder Policy
You open the test mailbox, create a single-instance appointment that starts and ends on some date more than a year ago.

To test the new Managed Folder Policy, you manually run the Managed Folder Assistant against your test mailbox:

Start-ManagedFolderAssistant -Mailbox "Joe Adams"

You expect the meeting, which (starts and) ends at some date more than a year ago, to be expired and the RetentionAction specified in the Managed Content Setting to be applied. It doesn't.

Calculating Retention Age for Calendar items

You can tell the MFA when to start counting an item's retention age from, by specifying it in the Content Settings for a Managed Folder. It can be based on:
1) When the item was delivered to a mailbox or
2) When the item was moved to a folder

Screenshot: Configuring retention period in Managed Content Settings
Figure 1: Configuring retention period in Managed Content Settings

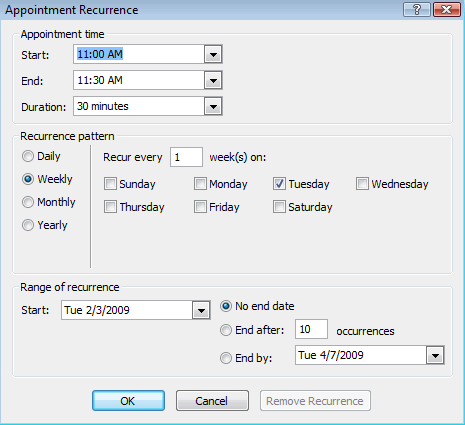
Calendar items such as meetings and appointments, and Tasks, are treated differently since these items have an end date. You could create a meeting for a future event, or create a recurring meeting that takes place at a certain interval (daily/weekly/monthly/yearly) during a certain period, or indefinitely. Therefore, the end date of these items needs to be considered when expiring them. Recurring meetings will expire based on the end date of the last occurrence. Meetings with no end date do not expire.


Figure 2: Recurring meetings can be scheduled to occur daily, weekly, monthly, or yearly for a long period, or indefinitely. When expiring such items, the MFA considers the end date.

If these items are deleted, and thus end up in the Deleted Items folder, the end date is no longer a factor. The Managed Folder Assistant expires Calendar items in the Deleted Items folder based on the message-received date. If the received-date cannot be determined, the message-creation date is used.

More details about retention age for different types of items in "How Retention Periods Are Calculated for Items in Managed Folders".

You locate an older PST and copy a Calendar item which occurs in roughly the same timeframe as the one you just created. When you run the MFA, the copied item with an end date from more than a year ago is expired!

When processing a mailbox, the MFA queries for Calendar items where the creation date is older than the expiration date. If you create a test item for a past date, as we did in this case, it does not get processed by the MFA until the creation date is older than the AgeLimitForRetention.


Figure 3: Calendar items created for a past date will have a creation time that is later than the meeting/appointment end time

Of course, you're not likely to run into this issue except in test scenarios. Real-world meetings do not get created in the past. The creation date is guaranteed to be equal to or older than the end date of the meeting..

Labels: , , , ,

Tuesday, December 09, 2008

If you're trying to get recipients from the whole AD Forest using the Exchange shell, there are two things to be aware of:

1. Session scope: By default, the scope of your shell session is set to the Domain of the computer you're running the session on.
2. Result size: By default, shell cmdlets return 1000 results. You can modify this using the Resultsize parameter. The number of search results to return can be specified, or you can use the value unlimited to return all results.

To view the current settings for your admin session, simply type $AdminSessionADSettings.

What you get back:

ViewEntireForest : False
DefaultScope : MyDomain.com
PreferredGlobalCatalog :
ConfigurationDomainController : MyDC.MyDomain.com
PreferredDomainControllers : {}

You can change the DefaultScope parameter to specify another domain or an OU. (Recipient cmdlets also have the OrganizationalUnit parameter which lets you restrict the command to a particular OU).

To return recipients from the whole Forest for all recipient cmdlets used in the session, you can set the session scope by using the following command:

$AdminSessionADSettings.ViewEntireForest = $True

Note, session variables are limited to the session. Once you close the shell window, it's gone. If you start another session, you'll need to set the ViewEntireForest variable to $True again.

You may find not having to return recipients from the entire Forest for the most part. If you do not want to change your session scope to the Forest, but return all recipients in a single recipient command, you can bypass the session scope by adding the IgnoreDefaultScope switch with recipient cmdlets:

Get-Mailbox -IgnoreDefaultScope -ResultSize unlimited

Other parameters such as the preferred GC, DC and config DC for the session can also be set by modifying the session variable.

Labels: , ,

Tuesday, November 04, 2008


Start Managed Folder Assistant for a single mailbox

Posted by Bharat Suneja at 10:33 AM
When testing Managed Folder Mailbox Policy settings in Exchange 2007, you may need to frequently run the Managed Folder Assistant (MFA)) to process a mailbox on-demand, so you can check the mailbox content and MRM logs. However, every time you run Start-ManagedFolderAssistant, the MFA processes all mailboxes on all Mailbox Databases on the server.

Of course, you can avoid all the agony by instructing the Managed Folder Assistant to process only the specified mailbox:

Start-ManagedFolderAssistant -Mailbox "Foo"

Processing a single mailbox results in the MFA completing its job quickly and makes parsing the MRM log easier— the MFA only logs events related to the specified mailbox.

The -Mailbox parameter does not take multiple mailboxes as input. To process more than 1 mailbox, you will need to use the Get-Mailbox cmdlet (or Get-User piped to Get-Mailbox, depending on the property you want to filter on) and pipe a filtered list of mailboxes to Start-ManagedFolderAssistant. For example, the following command will result in the MFA processing all mailboxes from the department:

Get-User -Filter {department -eq "Sales" -and RecipientType -eq "UserMailbox"} | Get-Mailbox | Start-ManagedFolderAssistant

Or maybe you want to have the MFA process all mailboxes with a particular policy applied. Note, the Filter requires the distinguishedName of the policy:

$policy = (Get-ManagedFolderMailboxPolicy "MRMPolicy-VPs").distinguishedName; Get-Mailbox -Filter {ManagedFolderMailboxPolicy -eq $policy} | Start-ManagedFolderAssistant

Labels: , , , ,

Monday, September 29, 2008


Disable Antispam agents on a Receive Connector

Posted by Bharat Suneja at 5:20 PM
Exchange 2007's antispam agents are enabled for all Receive Connectors on a transport server. Is there a way to disable the agents on a particular Receive Connector?

Although not as simple as turning an agent off for each IP address or Receive Connector, Exchange 2007's new transport permissions model allows you to do this just as easily.

The ms-Exch-Bypass-Anti-Spam permission is what allows a sender to bypass antispam agents. By default, mail from authenticated senders is not filtered.

To allow unauthenticated/anonymous senders to bypass antispam filters on a particular Receive Connector, use the following command:

Get-ReceiveConnector "My Receive Connector" | Add-ADPermission -User "NT Authority\Anonymous Logon" -AccessRights ExtendedRight -ExtendedRights ms-exch-bypass-anti-spam

Labels: , , , , ,

Friday, September 26, 2008

Have you been using the Set-MailboxCalendarSettings cmdlet to configure scheduling settings for resource mailboxes? Wish there was a graphical interface to configure these settings?

[PS] C:\>get-mailboxcalendarsettings cf-oahu | fl

AutomateProcessing : AutoAccept
AllowConflicts : False
BookingWindowInDays : 180
MaximumDurationInMinutes : 1440
AllowRecurringMeetings : True
EnforceSchedulingHorizon : True
ScheduleOnlyDuringWorkHours : False
ConflictPercentageAllowed : 0
MaximumConflictInstances : 0
ForwardRequestsToDelegates : True
DeleteAttachments : True
DeleteComments : True
RemovePrivateProperty : True
DeleteSubject : True
DisableReminders : True
AddOrganizerToSubject : True
DeleteNonCalendarItems : True
TentativePendingApproval : True
EnableResponseDetails : True
OrganizerInfo : True
ResourceDelegates : {}
RequestOutOfPolicy :
AllRequestOutOfPolicy : False
BookInPolicy :
AllBookInPolicy : True
RequestInPolicy :
AllRequestInPolicy : False
AddAdditionalResponse : False
AdditionalResponse :
RemoveOldMeetingMessages : True
AddNewRequestsTentatively : True
ProcessExternalMeetingMessages : False
DefaultReminderTime : 15
RemoveForwardedMeetingNotifications : False
Identity : MDomain.com/Conference Rooms/CF-Oahu

Output of Get-MailboxCalendarSettings cmdlet

Christian Schindler, MCT, MCA (Messaging), from Austria points out the little known fact that you can use OWA to configure calendar settings for resource mailboxes. Note, the user accounts for resource mailboxes are disabled by default. You would need to enable the account in ADUC before you try to logon using OWA.

An alternative to enabling resource mailboxes

If you want to avoid enabling resource mailbox accounts, here's an alternative. You can assign yourself (or any other account) FullAccess permission on the resource mailbox(es) you want to configure. Use the following command:

Get-Mailbox -Filter {RecipientTypeDetails -eq "RoomMailbox"} | Add-MailboxPermission -User "YourAccount" -AccessRights FullAccess

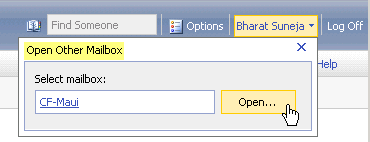
With the permission assigned, you can log on to OWA using your account, and open the resource mailboxes using OWA 2007's ability to open additional mailboxes, as shown in the following screenshot.

Screenshot: OWA | Open Other Mailbox


If you look at Options in OWA when logged in as an ordinary mailbox user (that is, not logged on to a resource mailbox), you see Calendar Options.

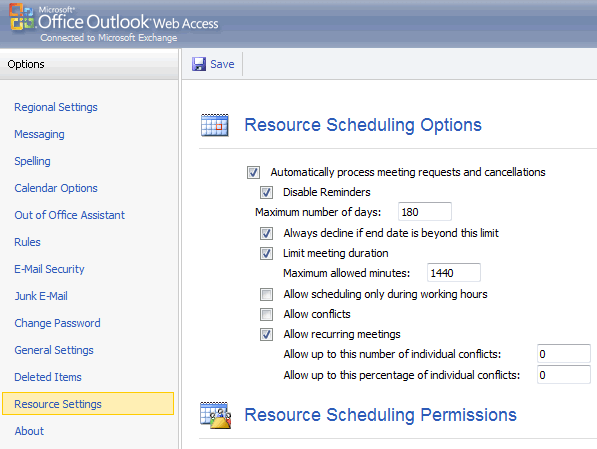
If you log on to a resource mailbox using OWA, you also see Resource Settings as one of the options.


Figure 1: The Resource Settings option is available in OWA when logged on to a resource mailbox. Full size screenshot here.

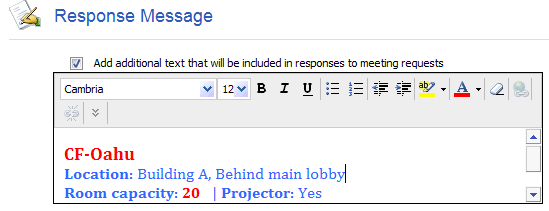
Not only does this allow you to configure the settings for automated processing of meeting requests, there's also a rich text editor for creating a custom response message.


Figure 2: The Resource Settings option also has a rich text editor for creating a custom HTML response message.

Labels: , , , ,

Tuesday, September 16, 2008


Configuring Deleted Item Retention

Posted by Bharat Suneja at 6:39 AM
After a user empties the Deleted Items folder, although these items disappear from the view of the mailbox, they are not completely deleted. They are retained till the Deleted Item Retention period expires in what's fondly referred to as the Dumpster— not to be confused with the Transport Dumpster maintained by Hub Transport servers.

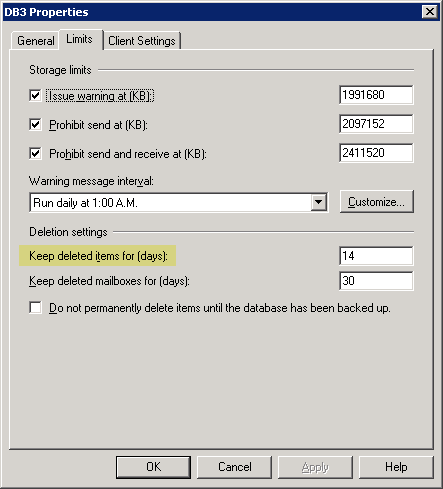
Deleted Item Retention (DIR) can be configured on the Mailbox Database. It is set to 14 days by default. The other related parameters that can be configured on the MDB include deleted mailbox retention period and the option to not purge deleted items until the MDB has been backed up.

Screenshot: Deleted Item Retention settings on Mailbox Database
Figure 1: Deleted Item Retention settings for a Mailbox Database


Configuring Deleted Item Retention per-mailbox
Individual mailboxes can be configured with a different Deleted Item Retention period, which bypasses the limit set on the Mailbox Database. To configure the individual DIR settings for a mailbox using the Exchange console:
1. In Recipient Configuration | Mailbox | select recipient --> Properties | Mailbox Settings tab | double-click Storage Quotas

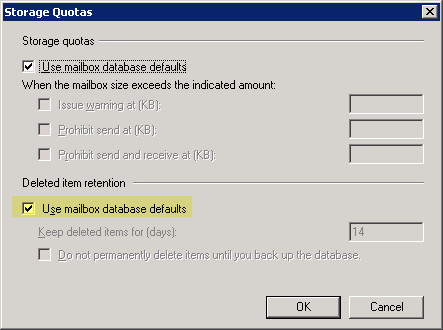
2. In the Storage Quotas property page, uncheck Use mailbox database defaults
Screenshot: Storage Quotas property page

3. In the Keep deleted items for days field, enter a new value

4. Optional: Check Do not permanently delete items until you back up the database

Why is it a good idea to not purge the dumpster till the Store has been backed up?
If not checked, items in the Dumpster will expire after the Deleted Items Retention period, and be permanently lost! If the Dumpster is purged before a backup takes place, the item is lost forever, with no way to recover it. Retention Policies in many organizations require that all messages or mailbox items should be recoverable.

5. Click OK to close the Storage Quotas property page | click OK to close mailbox properties.

Modifying the Deleted Item Retention period for a mailbox using the Exchange shell
The DIR period can be set by populating the RetainDeletedItemsFor property using the Set-Mailbox cmdlet. Using the shell's ability to pipe objects (output from one cmdlet to be processed by another cmdlet), you can use Get-Mailbox with the -Filter property and get the desired set of mailboxes to apply the new DIR period in bulk. You can also use a number of other properties to filter mailboxes based on the OU, Mailbox Database, Storage Group, etc. For example:

Get-Mailbox -OrganizationUnit "San Francisco" | Set-Mailbox -RetainDeletedItemsFor 20.00:00:00

(See Applying Managed Folder Policy to more than one user for more examples. The list of filterable properties that can be used in the -Filter parameter: Exchange 2007 RTM | SP1).

However, simply setting the RetainDeletedItemsFor property does not apply the new retention period to mailboxes. Remember the checkbox in the console for Use mailbox database defaults? How do we uncheck that using the shell?

Let's get all *Deleted* properties of a mailbox:

Get-Mailbox "My Mailbox" | ft *Deleted* -AutoSize

What you get back is:
Screenshot: Get-Mailbox output with all *Deleted* properties

The value modified by the checkbox in the console shows up in the DeletedItemFlags column in the Get-Mailbox output. It can have three values:
1) DatabaseDefault when the checkbox is selected
2) RetainForCustomPeriod when it's not
3) RetainUntilBackupOrCustomPeriod— a third value, if you've also selected the option not to purge the Dumpster before the Store's backed up.

At this point, I wouldn't blame you if you instinctively proceed to use the Set-Mailbox cmdlet to flip the DeletedItemFlags property from DatabaseDefault to RetainForCustomPeriod. However, this doesn't work.

What Get-Mailbox actually displays as the DeletedItemFlags is a calculated property— properties which are calculated and displayed for ease of administration, but aren't actual properties that can be modified using the corresponding Set-Whatever cmdlet.

The property we need to modify is called UseDatabaseRetentionDefaults. It's a boolean property— valid values can be $true or $false.

When setting a custom/non-default Deleted Item Retention period on mailboxes, we should set the UseDatabaseRetentionDefaults property to $false:

Set-Mailbox "My Mailbox" -RetainDeletedItemsFor 20.00:00:00 -UseDatabaseRetentionDefaults $false

The Get-Mailbox output after this is done:


If you also set RetainDeletedItemsUntilBackup to $true:


Getting Dumpster Statistics
To get the total number and size of deleted items in the dumpster for a mailbox, use the Get-MailboxStatistics cmdlet:

Get-MailboxStatistics [email protected] | Select *Deleted*

The output:

DeletedItemCount TotalDeletedItemSize
---------------- --------------------
752                16020237B

Doesn't the output from the above command include the Deleted Items folder?
No. To get the statistics for the Deleted Items folder, use:

Get-MailboxFolderStatistics [email protected] | where {$_.FolderPath -like "/Deleted Items"}

The output:

Date : 9/16/2008 7:15:49 PM
Name : Deleted Items
Identity : [email protected]\Deleted Items
FolderPath : /Deleted Items
FolderId : LgAAAAAaFeUR2TeSRpY38Ihx7YFNAQCK6B+B4tC8RbU9t9FmHnW4AAAAABIcAAAB
FolderType : DeletedItems
ItemsInFolder : 361
FolderSize : 6214440B
ItemsInFolderAndSubfolders : 361
FolderAndSubfolderSize : 6214440B
OldestItemReceivedDate :
NewestItemReceivedDate :
ManagedFolder : DI30days

Labels: , , ,

Wednesday, September 10, 2008


SCRIPT: Get Storage Group Backup Status

Posted by Bharat Suneja at 2:47 PM
Exchange 2007 Mailbox Databases expose backup-related properties using the Get-MailboxDatabase cmdlet:

Get-MailboxDatabase "My Database" -status | select *backup* | fl

What you get back:
BackupInProgress :
SnapshotLastFullBackup :
SnapshotLastIncrementalBackup :
SnapshotLastDifferentialBackup :
SnapshotLastCopyBackup :
LastFullBackup :
LastIncrementalBackup :
LastDifferentialBackup :
LastCopyBackup :

Here's a quick shell script that dumps each Storage Group and its backup-related information. I haven't had the time to build in any validation or test to run remotely, but you can use it on an Exchange 2007 server to get the following details:

1. Storage Group Name
2. Transaction log file path
3. Date Storage Group was created
4. Name and timestamp of the oldest transaction log file
5. Number of transaction log files in the path
6. Mailbox Databases in each Storage Group
7. For each MDB, time when full, incremental, and differential backups (Streaming or VSS) were performed
(including a warning if the first log file is still available, which basically means a Full backup has never been completed).

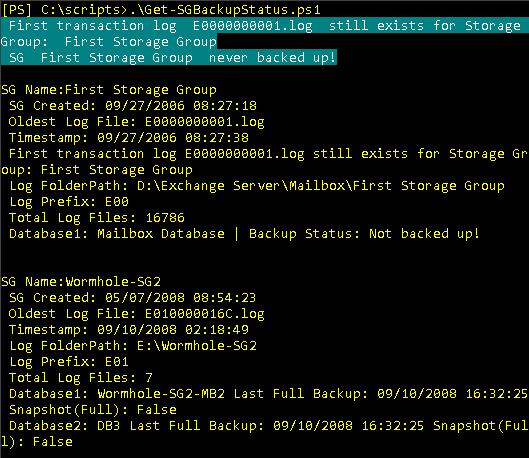
In the following screenshot, the First Storage Group has never been backed up, so the E**00000001.log file still exists (and its timestamp is same as the Storage Group's creation time). The second Storage Group has just been backed up, and therefore has fewer transaction logs.

Screenshot: Output of Get-SGBackupStatus.ps1 script
Figure 1: Output of Get-SGBackupStatus.ps1 script

File: Get-SGBackupStatus.zip
Date: 9/11/2008

What needs to be added:
- Time (number of days/hours) from last backup
- Warning when last backup is older than X number of days

Using the -Status switch: Reader Wolfgang Sauer points out

If you saw this post yesterday and wondered why the *backup* fields in Get-MailboxDatabase output were showing up as blank (or $null in PowerShell-speak), even after a backup has been taken, it's because we left out the -Status switch that's required with Get-MailboxDatabase cmdlet to make these details show up. Thanks to reader Wolfgang Sauer from Germany for pointing out the omission.

The script and the screenshot have been updated accordingly. If you downloaded the script before today, please download the updated version.

Disclaimer:
All scripts/downloads on this site provided as-is, with no warranties, and confer no rights. Please test any scripts/downloads in a lab environment before using it in production.

Labels: , , ,

Wednesday, September 03, 2008


HOW TO: Prevent annoying spam from your own domain

Posted by Bharat Suneja at 8:46 AM
One of the more annoying types of spam is the one that seems to be coming from your own domain; or worse— from your own email address! Of course, users from your own domain don't generally spam each other— unless you're using one of the free web-based email services. And most of us don't spam ourselves.
Obviously, this is coming from a spammer who has spoofed your email address, or that of someone else from your domain. Unfortunately, SMTP— the protocol that allows mail clients and servers to exchange email, allows headers to be spoofed easily.

In Exchange Server 2007, Accepted Domains tell Exchange which domains to accept email for. If a domain - e12labs.com in this example, exists as an Accepted Domain, there is no reason external senders should use that domain in the MAIL or FROM headers.

You may have remote POP3/IMAP4 users who use SMTP to send mail. However, such sessions should be authenticated, and preferably use a separate Receive Connector.

Thanks to the extensive Transport Permissions model in Exchange 2007, we can easily prevent such spam. Receive Connectors have the ms-exch-smtp-accept-authoritative-domain-sender permission which dictates whether an Accepted Domain can be used in the MAIL or FROM headers. External/internet hosts submit mail to your server without authentication, as anonymous senders. To prevent anonymous senders from sending mail using your domain(s), we need to remove the ms-exch-smtp-accept-authoritative-domain-sender permission assigned to them.

Use the following command to remove the ms-exch-smtp-accept-authoritative-domain-sender permission from NT Authority\Anonymous Logon on internet-facing Receive Connector(s):

Get-ReceiveConnector "My Internet ReceiveConnector" | Get-ADPermission -user "NT AUTHORITY\Anonymous Logon" | where {$_.ExtendedRights -like "ms-exch-smtp-accept-authoritative-domain-sender"} | Remove-ADPermission

Once this permission is removed, when anonymous senders try to submit mail using your Accepted Domain(s), here's how the SMTP conversation goes:

220 E12Postcard.e12labs.com Microsoft ESMTP MAIL Service ready at Wed, 3 Sep 2008 06:22:43 -0700
helo
250 E12Postcard.e12labs.com Hello [172.31.0.170]
mail from:[email protected]
550 5.7.1 Client does not have permissions to send as this sender

Exchange stopped spoofing of P1/envelope headers. Let's continue the session and try to spoof the P2 headers (the ones in the DATA part of the message) — maybe that'll work!

mail from:[email protected]
250 2.1.0 Sender OK
rcpt to:[email protected]
250 2.1.5 Recipient OK
data
354 Start mail input; end with .
from:[email protected]
subject: Header spoofing

This is how we spoof headers, spoof headers.

.
550 5.7.1 Client does not have permissions to send as this sender
quit
221 2.0.0 Service closing transmission channel

As you can see, removing the ms-exch-smtp-accept-authoritative-domain-sender permission stops spoofing of your domains in both envelope (P1) and message (P2) headers.

When not to remove the permission?
Is there a scenario where one should not remove the ms-exch-smtp-accept-authoritative-domain-sender permission from NT Authority\Anonymous Logon? Yes, on Receive Connectors used by internal or trusted SMTP hosts (such as copiers/scanners and application servers) that submit mail without authentication.

But you do have these internal/trusted hosts submitting to a separate Receive Connector, don't you?

Related posts:

Labels: , , , ,

Tuesday, July 29, 2008

Users consider email to be a reliable communication mechanism - not as reliable as the dial tone, but pretty close. Most users expect mail to be delivered within minutes, if not seconds.

Many organizations, including those operating in the financial & banking sectors, have strict SLAs for mail delivery which specify mail delivery times granularly— for mail within a particular location (that is, within a Routing Group in Exchange 2003 and within an AD Site in Exchange 2007), between two locations, and to/from the internet.

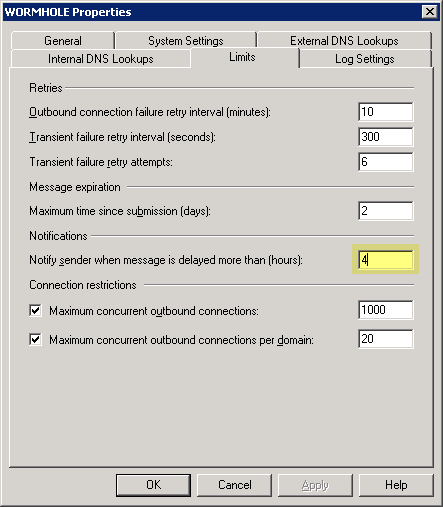
Exchange Server sends a delay notification to inform the sender if delivery of a message is delayed beyond a configured timeout. The default delay notification timeout in Exchange Server 2003 is 12 hours. This has been reduced to a (comparatively) more realistic 4 hours in Exchange Server 2007.

When considering changing these defaults, it's a good idea to consider any SLAs and user expectations. Is it reasonable to expect a user to wait for 24 hours before informing him/her about a delay? 12 hours? 1 hour?

Screenshot: Transport Server properties
Figure 1: In Exchange 2007, the default delay notification timeout is 4 hours

You can change the delay notification timeout using the Exchange console (EMC) from Server Configuration | Hub Transport | SERVERNAME -> Properties | Limits tab.

To change delay notification timeout using the Exchange shell:

Set-TransportServer "SERVERNAME" -DelayNotificationTimeout 01:00:00

This sets the notification timeout to 1 hour. The value is specified in dd.hh:mm:ss (the standard format used by the shell). Valid values— minimum: 00:00:01 (yes, 1 second!) to 30.00:00:00 (30 days). It's recommended to wait till transient failure retries have been completed before sending a delay notification (that is, higher than TransientFailureRetryInterval x TransientFailureRetryCount).

In Exchange Server 2003, the delay notification timeout can be changed from SMTP Virtual Server | Properties | Delivery tab. There are different delay notification timeouts for outbound and local mail.

If you decide users don't need to know about mail delivery delays (and there could be perfectly legitimate reasons for that - although as I write this I can't think of any... ), you can disable delay notifications:

Set-TransportServer "SERVERNAME" -ExternalDelayDsnEnabled $false -InternalDelayDsnEnabled
$false

Have you changed the default delay notification in your organization? What is a reasonable time for notifying users about delays?

Related:

Labels: , , ,

Monday, July 28, 2008


PowerShell: Listing multi-valued attributes

Posted by Bharat Suneja at 12:27 PM
In previous posts, we've taken a look at how to update multi-valued attributes and remove values from multi-valued attributes using PowerShell/Exchange Shell (EMS).

Multi-valued attributes have a special significance in AD, and interfaces/APIs used to access AD. Whereas single-valued attributes can be retrieved and updated quite easily, multi-valued attributes come with a twist. Values from a multi-valued attribute are returned as an array (of values). To evaluate values in a multi-valued attribute, you need to iterate through each one (using a foreach loop in most cases). Similarly, when updating a multi-valued attribute, we need to remember we're adding/updating one value of what could possibly be multiple items in an array.

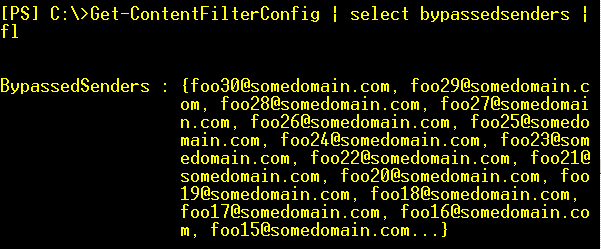
With that out of the way, a real-word experience relates to how these values are listed in Exchange shell cmdlet output. For instance, the BypassedSenders property of ContentFilterConfig may have a few dozen safe senders that you do not want to subject to the Content Filter. If you list these bypassed senders using Get-ContentFilterConfig, the output will list a few bypassed senders. Note the trailing dots to indicate there are more values?

Using a format-list or fl (Get-ContentFilterConfig |select BypassedSenders | fl) doesn't help.

Screenshot: Multi-valued attributes and PowerShell
Figure 1: Output from Exchange shell cmdlets does not list all values in multi-valued attributes

BypassedSenders and Safelist Aggregation

The Content Filter Agent does not filter messages from addresses on its BypassedSenders property, regardless of the recipient. This should not be confused with a recipient's Safe Senders list (used by the Safelist Aggregation feature) to bypass mail for a recipient from the senders he/she adds to Safe Senders list in Microsoft Outlook. CFA's BypassedSenders is global in scope.

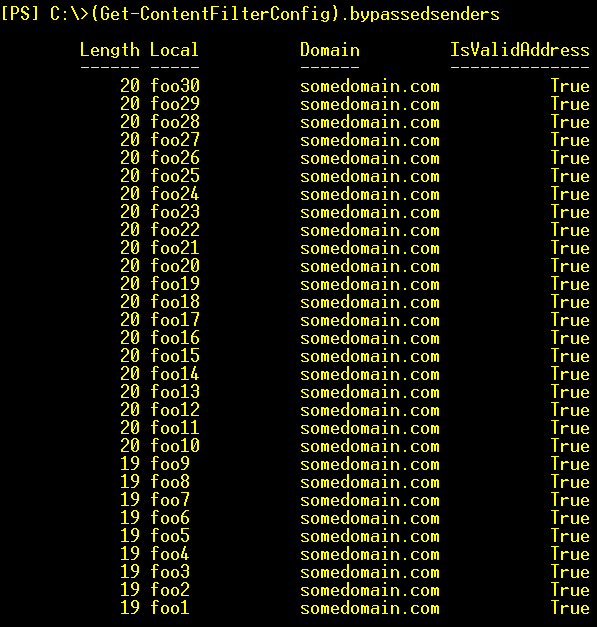
To get a list of all values in a multi-valued attribute such as BypassedSenders:

$senders = (Get-ContentFilterConfig).BypassedSenders; $senders

Alternatively, you can list them without adding them to a hash table ($senders in above example):

(Get-ContentFilterConfig).BypassedSenders


Screenshot: Multi-valued attributes and PowerShell 2
Figure 2: Listing all values in BypassedSenders multi-valued attribute

Similarly, multiple IP addresses or address ranges in a Receive Connector's RemoteIPRanges property:

(Get-ReceiveConnector "MyConnector").RemoteIPRanges

or formatted as a table with the required info:

(Get-ReceiveConnector "MyConnector").RemoteIPRanges | ft Lowerbound,Upperbound,RangeFormat -AutoSize

Screenshot: Multi-valued attributes and PowerShell 3
Figure 3: Listing all values in RemoteIPRanges multi-valued attribute of a Receive Connector

Related posts:

Labels: , , ,

Thursday, July 24, 2008

In Exchange Server 2003/2000, expanding a Mailbox Database provides information about mailboxes in a database, last logon/logoff times and account(s) that logged on to mailboxes (see 'Displaying Client IP Address in Exchange System Manager' for details).

Screenshot: Store Logons
Figure 1: In Exchange 2003, the Logons node displays Store logon-related information. Click here to see a bigger screenshot.

In Exchange Server 2007, these details are not displayed in the EMC. The reasons are not hard to guess. These details are retrieved by querying the mailbox database. In Exchange 2003, these were displayed when you selected the mailbox database, resulting in a single mailbox database being queried. In Exchange 2007, mailboxes are displayed when you select Recipient Configuration -> Mailboxes, and depending on the selected scope/filter, the console displays mailboxes from the entire organization. Querying all mailbox databases on different servers in a distributed organization can become very slow, generate a lot of extra network traffic— terribly inefficient.

Instead, why not allow the administrator to query for these details when they're actually required? The shell provides you the flexibility to only get the fields you want, only for the mailboxes you want, making it much more efficient. If you manage smaller Exchange deployments and love your GUI management tools, you may not fall in love with the idea. (But that debate's already settled, and you're going to have to learn some bit of Exchange shell to be able to manage Exchange 2007 and later. The good news is, it's cooler, easy-to-use, well-documented by now, and comes with plenty of help!).

Logon Statistics
The Get-LogonStatistics cmdlet provides the following logon-related information.

AdapterSpeed :
ClientIPAddress :
ClientMode :
ClientName :
ClientVersion :
CodePage :
CurrentOpenAttachments :
CurrentOpenFolders :
CurrentOpenMessages :
FolderOperationCount :
FullMailboxDirectoryName :
FullUserDirectoryName :
HostAddress :
LastAccessTime :
Latency :
LocaleID :
LogonTime :
MACAddress :
MessagingOperationCount :
OtherOperationCount :
ProgressOperationCount :
RPCCallsSucceeded :
StreamOperationCount :
TableOperationCount :
TotalOperationCount :
TransferOperationCount :
UserName :
Windows2000Account :
ServerName :
StorageGroupName :
DatabaseName :
Identity :

The command can be constrained to a mailbox database (get-logonstatistics -Database "MyDatabase" | fl), a mailbox server (get-logonstatistics -Server "MyServer"), or a particular mailbox.

Mailbox information
In ESM, the Mailboxes node of a Mailbox Store displays mailbox-related information such as mailbox size, number of items, and last logon/logoff.

Screenshot: Mailboxes node in Exchange 2003 ESM
Figure 2: In Exchange 2003, the Mailboxes node displays mailbox-related information. Click here to see a bigger screenshot.

This information can be retrieved using the Get-MailboxStatistics cmdlet. It provides the following information related to a mailbox:

AssociatedItemCount :
DeletedItemCount :
DisconnectDate :
DisplayName :
ItemCount :
LastLoggedOnUserAccount :
LastLogoffTime :
LastLogonTime :
LegacyDN :
MailboxGuid :
ObjectClass :
StorageLimitStatus :
TotalDeletedItemSize :
TotalItemSize :
Database :
ServerName :
StorageGroupName :
DatabaseName :
Identity :

It can also be constrained to a -Database, -Server, or mailbox.

Now that we're dealing with the shell, besides these cmdlets' built-in filtering capabilities (Database, Server, or mailbox), you can use Powershell's where-object cmdlet to further filter the results based on the properties returned by each cmdlet. For example, to find out logon sessions from a particular IP address:

Get-LogonStatistics -Server "MyServer" | where {$_.ClientIPAddress -like "192.168.2.101"}

Labels: , , , ,

Tuesday, July 15, 2008

It's easy to get a list of all members of a Distribution Group. The Exchange shell (EMS) ships with the Get-DistributionGroupMember cmdlet that makes it a short one-liner (compared to 100s of lines of code in VBS).

However, how do we get all Distribution Groups a user, group, or contact is a member of? There's no equivalent cmdlet that can list a recipient's distribution group memberships using the shell. From the AD side, a recipient's memberOf attribute is a back-linked attribute, which I briefly talked about in memberOf Attribute can now be used in OPATH filters!. A group's membership is stored in the group's member attribute.

In the following command/script (what's the boundary between a command and a script?? when do a bunch of commands become a script?), we look at all distribution groups in AD, look at each member and determine if it matches the one we're looking for.

$contact = get-contact "[email protected]"; Get-DistributionGroup | foreach {$dg = $_ ; write-host "Looking at: "
$dg; Get-DistributionGroupMember $dg | foreach {if ($_.identity -like $contact.identity) {"Member of : " + $dg} }}

Clearly, this isn't very efficient!

Using the ADSI provider

The shell can also look at the AD objects natively using the ADSI provider. It's not as friendly or easy to use (as a native AD provider for Powershell would probably be), but it's a huge improvement over VBScript. There's no need to grab AD objects into ADO recordsets— that part is taken care of by Powershell.

Here's one way to do this using the ADSI provider:

$dn = "LDAP://" + (Get-Contact [email protected]).distinguishedName; $foo=[ADSI]$dn; $foo.memberOf | foreach {$dg = $_; get-distributiongroup $dg}

Here's a script with some changes and validation: Get-DGMembership.zip

What it does: Uses the ADSI provider to get list of all groups a recipient is a member of, determines if the group is a Distribution or Security group, outputs names of Distribution Groups.
Usage:

.\Get-DGMembership.ps1 [email protected]

.\Get-DGMembership.ps1 [email protected] [email protected]

What we can really use is a native AD provider that lends the same automation capabilities to AD management tasks that the Exchange shell and Powershell lend to Exchange and Windows management tasks.

Labels: , , , , ,

Monday, July 07, 2008

I posted about this in Adventures with OPATH: some annoyances if you're used to LDAP, shortly after Exchange Server 2007 RTMed (Yes, it has really been that long... ). Here's a quick recipe to create a Dynamic Distribution Group to include all mailboxes on a database.

$DB = (Get-MailboxDatabase "SERVER\Storage Group\Mailbox Database").distinguishedName

New-DynamicDistributionGroup MyGroup -RecipientFilter {Database -eq $DB} -RecipientContainer "DC=MyDomain,DC=com" -OrganizationalUnit "OU=Distribution Groups,DC=MyDomain,DC=com" -RequireSenderAuthenticationEnabled $false

The first step gets the distinguishedName of the mailbox database in a variable called $DB.

Parameters:
- OrganizationalUnit: Specifies the container/OU where the group will be created
- RecipientContainer: Specifies container to pick up recipients from. If not specified, this gets set to the same value as the OrganizationalUnit parameter (the OU/Container where the group is created), and the filter may not return the expected recipients (or worse— may not return any recipients at all... )
- RequireSenderAuthenticationEnabled: As discussed in 'New Distribution Groups do not receive internet email by default', new groups do not receive internet email (that is, email from unauthenticated/anonymous senders)) by default. If you want the group to receive internet email, set this to $false.

Labels: , ,


Controlling OOFs per domain and per mailbox

Posted by Bharat Suneja at 9:49 AM
OOFs can be controlled per domain using Remote Domain settings. By default, setup creates the default Remote Domain for address space *. (As with Connector namespaces, * translates to all domains for which Exchange isn't authoritative/has an Accepted Domain for, and doesn't have an explicit Remote Domain for).


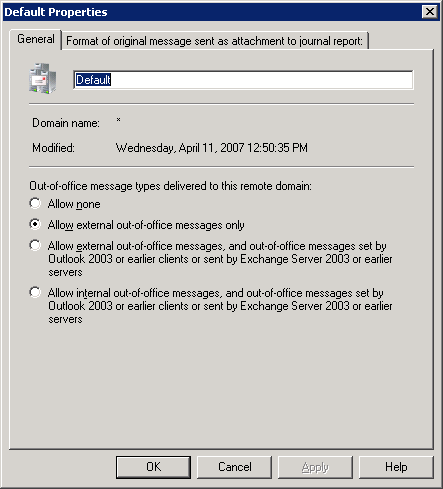
Figure 1: Remote Domains allow control of OOF messages to the internet or specific domains

The choices:
None: OOFs are disabled for the remote domain.
External: Allows only external OOFs to be sent to the remote domain. OOFs created using legacy Outlook clients and those sent by Exchange 2003/2000 servers will be not be allowed. If blocking OOFs to external domains in Exchange 2003/2000, this allows you to restrict legacy Outlook clients from sending OOFs, but allow Outlook 2007/Exchange 2007 users to send external OOFs.
ExternalLegacy: Allows external and legacy OOFs to be sent to the remote domain.
InternalLegacy: Allows internal and legacy OOFs to be sent to the remote domain.

Allowing Internal OOFs to Remote Domains

The InternalLegacy setting sends internal OOF messages to a Remote Domain. If verbiage or content of internal OOFs isn't something you want to share with the outside world, do not use this for Remote Domains.


The InternalLegacy option can be useful in distributed organizations with multiple address spaces and multiple email systems, or specific cases where you may want to share such information with a trusted organization.

Controlling OOFs per-mailbox

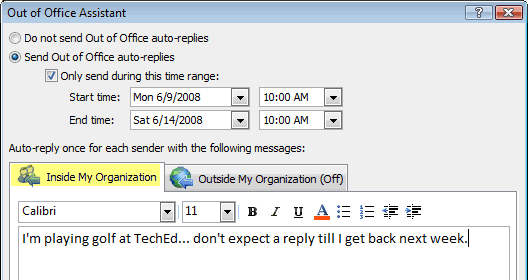
Besides the settings in Remote Domains, you can also control external OOFs per-mailbox. This is done using the Set-Mailbox cmdlet. The ExternalOofOptions parameter defaults to External. You can change it to InternalOnly to restrict a mailbox user from sending OOFs outside the organization:

Set-Mailbox [email protected] -ExternalOofOptions InternalOnly


Labels: , , ,

Tuesday, June 24, 2008

I remember writing plenty of scripts to report on different things such as user accounts created every week/month, user accounts modified, accounts disabled, etc. for SOX compliance. Some of those scripts used to be rather long, and in hindsight— involved a lot more lines of code than an administrator should have to write. Although I had a lot of fun (and still do... albeit with PowerShell), I would totally understand if you said you never wanted to hear about things like Wscript, VBScript, WSH, COM objects, ADSI, and WMI ever again.


Let's take a look at how the shell (EMS) makes it so easy.

In this example, we need to get a list of all accounts created in the last 7 days. When a user account is created, its whenCreated attribute gets stamped with the time of creation. Here's how it can be used:

Get-User -resultsize unlimited | where {$_.WhenCreated -gt (get-date).adddays(-7)} | ft Name,whenCreated -Autosize

Similarly, when an AD object is changed, it's whenChanged attribute gets stamped with the time the change was made. This makes it easy to determine which objects were changed in a given period, a useful tool for auditing/reporting as well as troubleshooting. In the following example, we determine if any Receive Connectors were changed in the last 7 days.

Get-ReceiveConnector | where {$_.whenChanged -gt (get-date).adddays(-7)}

Another frequently required and requested report— how do I get a list of mailboxes that haven't been accessed in the last X days. Let's use 100 days as the value here:

Get-MailboxStatistics -resultsize unlimited | where {$_.LastLogonTime -lt (get-date).AddDays(-100)} | ft displayName,lastlogontime,lastloggedonuseraccount,servername

Or mailboxes that have never been logged on to:

Get-MailboxStatistics -resultsize unlimited | where {$_.LastLogonTime -eq $null | ft displayName,lastlogontime,lastloggedonuseraccount,servername

Note, you can filter mailboxes by Database or ServerName to restrict the results to a more manageable size.

Disconnected/Disabled Mailboxes
Next, let's list mailboxes disabled in the last 14 days:

Get-MailboxStatistics | Where {$_.DisconnectDate -gt (get-date).AddDays(-14)} | ft displayName,ServerName,DatabaseName,TotalItemSize -Autosize

Labels: , , ,

Tuesday, June 17, 2008


Starting Task Manager in RDP or VM sessions

Posted by Bharat Suneja at 5:49 PM
You have a RDP (Terminal Services) session or a Virtual Machine session open, where the CTRL-ALT-DEL key combination fires up the Windows Logn/Security dialog on the host computer rather than the RDP or VM session you have open.

Getting to the Task Manager involves some mouse-clicks in such situations— Start -> Windows Security -> Task Manager (works in both RDP and VM sessions) or clicking on the appropriate shortcut in the VM client software. Hyper-V has a short-cut on its menu bar that makes it a single mouse click, but still not quick enough. It's actually annoying if you are happily pounding away at the keyboard for most part... and now need to lift your hand to grab a mouse and... you know where we're going with this!

Shorcuts exist - if you're at the cmdline, you can simply type taskmgr.exe (or Start -> Run -> type taskmgr.exe). Alternatively, you can create a desktop shortcut and point it to taskmgr.exe. If you simply want to remain at the cmdline and not bother with the GUI at all, use TaskList. You can filter the output in a number of ways - use tasklist /? to see all the options.

If you're on an Exchange 2007 box or have Windows PowerShell installed, it gets event better. Get-Process and Stop-Process commands are your friends here. You can filter by process name or PID, and also pipe the output from Get-Process to Stop-Process. For example:

Get-Process -Name svchost
Get-Process -Name MSExchange* | ft Id,Name,Handles,PM -AutoSize
Get-Process | ft Name,Company,ProductVersion,FileVersion -Autosize
Stop-Process -ID 6064
Get-Process mmc* | where {$_.Handles -gt 1000} | stop-process

Labels: , ,

Monday, June 16, 2008


Quick antispam report or status check?

Posted by Bharat Suneja at 8:06 AM
Having received an annoyingly higher proportion of spam in my Inbox this morning, I wanted to quickly check what the antispam agents are doing. Here's a quick cmdlet (besides the ones to check whether the antispam agents are enabled, checking the Content Filter SCL thresholds, etc.).

Get-AgentLog -StartDate "6/16/2008" | group action | ft name,count -Autosize

What you get back:

Name Count
---- -----
RejectCommand 520
AcceptMessage 39
RejectMessage 163
QuarantineMessage 11
DeleteMessage 21

The filters are still working. Perhaps it's one of those days when you wake up to high volume of spam.

Note to self: Create a quick monitoring script that provides more information from agent logs, antispam configs, and perfmon counters.

Related posts:
- Keeping tabs on Antispam filters: A few handy scripts in Exchange Server 2007
- Exchange Server 2007: How are RBLs performing?
- Exchange Server 2007: Managing And Filtering Anti-Spam Agent Logs

Labels: , , , ,

Tuesday, May 20, 2008

Another frequently asked question about SMTP mail - how can I remove internal host names and IP addresses from outbound internet mail? More often than not, this results from the belief that somehow if the outside world finds out an organization's internal IP addresses and host names, it makes the organization vulnerable. Auditors love to point this out for some reason. Perhaps it's a part of a checklist written by a security expert at some law firm somewhere, and given the viral nature of checklists it's all over the place!

Let's take a look at what we're talking about here. As a message makes its way from one server to another, it may be handled by more than one SMTP hosts. Each host adds a RECEIVED header at the beginning of message headers, leaving a trace of where the message has been and when (a timestamp).

Here are headers from a message received from Dell. (Unnecessary headers removed).

Received: from smtp.easydns.com (205.210.42.52) by exchange.somedomain.com
(192.168.2.171) with Microsoft SMTP Server id 8.1.240.5; Mon, 19 May 2008
03:12:46 -0700
Received: from mh.dell.m0.net (mh.dell.m0.net [209.11.164.66]) by
smtp.easydns.com (Postfix) with ESMTP id 647C222914 for ;
Mon, 19 May 2008 06:14:46 -0400 (EDT)
Received: from [192.168.138.130] ([192.168.138.130:57330]
helo=fc13a1.dc1.prod) by oms1.dc1.prod (ecelerity 2.1.1.24 r(19486)) with
ESMTP id 3B/AF-18306-11351384 for ; Mon, 19 May 2008
03:14:41 -0700

Message-ID: <[email protected]>
Date: Mon, 19 May 2008 03:14:41 -0700
From: Dell Small Business
Reply-To:
To:
Subject: $429 desktop, plus new laptops. Hurry and shop now.
Errors-To: [email protected]
Return-Path: [email protected]

These headers can be used to determine the path taken by a message— useful information for troubleshooting and preventing message loops.

What the standards say
Let's take a look at what the standards say. RFC 2821 says (capitalization of words as it appears in the RFC, emphasis added):
4.4 Trace Information

When an SMTP server receives a message for delivery or further processing, it MUST insert trace ("time stamp" or "Received") information at the beginning of the message content, as discussed in section 4.1.1.4.

This line MUST be structured as follows:

- The FROM field, which MUST be supplied in an SMTP environment, SHOULD contain both (1) the name of the source host as presented in the EHLO command and (2) an address literal containing the IP address of the source, determined from the TCP connection.
and prohibits removing received headers (repeatedly). One example:
An Internet mail program MUST NOT change a Received: line that was previously added to the message header. SMTP servers MUST prepend Received lines to messages; they MUST NOT change the order of existing lines or insert Received lines in any other location.
More secure?
Should you remove these headers, and "hide" internal hosts and IP addresses? Is it really a security risk?

There are many opinions about security through obscurity, but if your security relies on hiding internal hostnames and IP addresses, you probably have other things to worry about.

Steve Riley, Senior Security Strategist at Microsoft, says:
In general, you can’t achieve any additional security by trying to hide things that weren’t designed to be hidden. IP addresses, wireless SSIDs, hostnames—these are all identifiers, and by definition, an identifier is intended to be known. Efforts to hide them generally fail, because the thing that the identifier points to still exists! Determined attackers will find the thing regardless of what you name it.
Microsoft does not remove internal message routing headers. Nor do Dell (as the message headers in the example above reveal), HP, and many other large organizations.

In many ways, the issues faced are similar to changing fqdn on SMTP Virtual Server/Receive Connector. Even if you make these changes, at least one internal hostname is likely to be revealed by the Message-ID (read "Masquerading SMTP Virtual Servers: Changing the fqdn and masquerade domain").

Nevertheless, many organizations may have a legitimate need to cleanse outbound mail of internal host names and IP addresses, and you probably don't want to invite adverse remarks in an IT or compliance audit (should you find such a requirement on the auditor's checklist).

How to remove Received headers in Exchange Server 2007
Exchange Server 2007 offers an easy way to accomplish this. If your transport server sends outbound email directly using DNS lookup, or delivers to a smarthost without authentication, simply remove the Ms-Exch-Send-Headers-Routing permission assigned to Anonymous Logon— a well-known security principal that refers to anonymous users, as shown below:

Get-SendConnector "Connector Name" | Remove-ADPermission -AccessRight ExtendedRight -ExtendedRights "ms-Exch-Send-Headers-Routing" -user "NT AUTHORITY\Anonymous Logon"

What's your take?
Does your organization remove internal Received headers? What are the reasons cited? Does removing internal received headers make your organization more secure? Feel free to leave a comment and share your opinion about this.

Labels: , , , ,

Monday, March 17, 2008

Standby Continuous Replication (SCR) is a new High Availability feature in Exchange Server 2007 SP1. It uses Continuous Replication (also used by LCR and CCR) to replicate Storage Groups from a clustered or non-clustered mailbox server, known as a SCR source, to a clustered or non-clustered mailbox server, known as a SCR target.

SCR is managed using the Exchange shell - no management features exist in the EMC to configure or manage it.

Unlike LCR and CCR, which are designed to have a single copy of a Storage Group (consisting of an Exchange Store EDB + transaction logs & system files), SCR is designed to have many-to-one and one-to-many "replication relationships". (A SCR relationship or partnership - not formally defined terms, but simply used to explain the concept here - is SCR replication of a particular Storage Group from a SCR source server to a particular SCR target server).

A Storage Group from one SCR source can be replicated to multiple SCR target servers, and Storage Groups from one or more SCR source mailbox servers can be replicated to a single SCR target mailbox server.

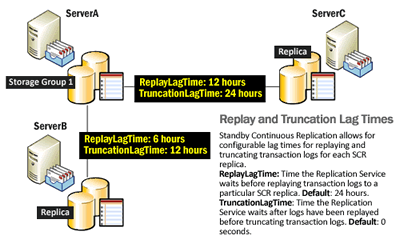
By default, the Replication Service delays replaying 50 transaction logs to the SCR replica Database. Additionally, you can configure the following parameters to control how SCR replicas behave:
ReplayLagTime: specifies how long the Replication Service waits before replaying replicated transaction logs to the replica Database (EDB) on the target. Default:1 day
TruncationLagTime sets a lag time for truncating log files on that replica. Provided the other requirements are met for log file truncation on the SCR replica, log files are not truncated till ReplayLagTime + TruncationLagTime has elapsed. Default:0.

Why do I need the delay?

Replay lag gives you the protection of having a copy of your database from back in time. This back-in-time copy can be used to recover from logical corruption, pilot errors etc.

Additionally, if there is no delay, in the case of a lossy failover of the SCR source to a LCR or CCR replica, the (new source) Database will be behind its SCR target(s), requiring reseeding. Not something one would want to do for large Databases over WAN links (or even locally within the same datacenter). Delaying the last 50 transaction logs from being replayed to the SCR target avoids the need to reseed.

However, a large number of transaction logs not replayed to the Database means increased storage requirements for the SCR target, and also an increase in the time it takes to activate it in case of failure of the SCR source. Before it can be brought online, all the logs will need to be replayed.

To avoid this, you can set the ReplayLagTime to 0 (from the default of 1 day). Note, the replay will still lag behind by 50 transaction logs - a hard-coded limit enforced by SCR that cannot be changed. The TruncationLagTime can be set higher, so logs are replayed but not truncated. You can then take VSS snapshots of the target for the point-in-time copies.

Once setup using the Enable-StorageGroupCopy command, the ReplayLagTime and TruncationLagTime cannot be changed without disabling and re-enabling that SCR relationship for the Storage Group.

How can I see ReplayLagTime and TruncationLagTime? The following command shows the SCR targets a Storage Group is being replicated to:

Get-StorageGroup "SG Name" | fl

However, neither the above command, nor Get-StorageGroupCopyStatus show the lag times.

The parameters are returned as an array when you use the former (Get-StorageGroup) - only the name of the SCR target is displayed in the StandbyMachine property.

To see the lag times:

$sg = Get-StorageGroup "MyServer\MyStorageGroupName"
$sg.StandbyMachines

Here's what it looks like:


Figure 1: Displaying the Replay and Truncation lag time

Can I change ReplayLagTime and TruncationLagTime without reseeding the Database? You need to disable replication and re-enable it to add or modify the lag times. :

Disable-StorageGroupCopy "Storage Group Name" -StandbyMachine "SCR Target Server"

When disabling SCR, you get prompted to delete all files in the replica folder on the SCR target. Skip that. Reseeding is not required if you do not delete the files:

WARNING: Storage group "DFMAILMAN.e12labs.com\dfmailman-sg1" has standby continuous replication (SCR) disabled. Manually delete all SCR target files from "C:\Exchange Server\Mailbox\First Storage Group" and "C:\Exchange Server\Mailbox\First Storage Group\Mailbox Database.edb" on server "mirror".

Now, let's enable SCR with the replay and truncation lag times:

Enable-StorageGroupCopy "Storage Group Name" -StandbyMachine "SCR Target Server" -ReplayLagTime 1.00:00:00 -TruncationLagTime 2.00:00:00

Once replication is enabled again, make sure to test replication status using:

Get-StorageGroupCopyStatus "SG Name" -StandbyMachine "SCR Target Server"

Labels: , , ,

Tuesday, March 11, 2008


Routing outbound mail using a particular IP address

Posted by Bharat Suneja at 11:35 AM
A question that frequently and inevitably pops up when discussing Exchange transport is that of being able to route outbound mail using a particular IP address. The Exchange Server 2003/2000 transport architecture was confusing for many newcomers— the difference between an SMTP Virtual Server and an SMTP Connector being the main cause of this confusion. This is further exacerbated by the fact that SMTP Connectors use SMTP Virtual Servers as bridgeheads.

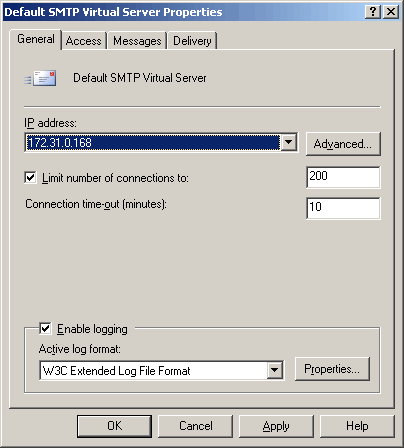
Screenshot: SMTP Virtual Server properties - General tab
Figure 1: In Exchange Server 2003/2000, the IP address binding in SMTP Virtual Server properties is only for inbound connections

I've often quoted Scott Landry's post on the team blog— SMTP Virtual Server Myths Exposed. Myth #4 in Scott's post:
Myth 4: Virtual Server IP Address Will Be Used For Outgoing Connections

The last source of misunderstanding is the socket which will be used to open an SMTP connection. This may seem confusing and somewhat contradictory of my first point, but SMTP simply tells the Windows network stack to provide SMTP with a socket. It does not provide a source IP address to use, and as such, you will notice that the source IP address assigned by Windows will be based on the Windows routing table, not taking into consideration the IP of the SMTP VSI that is delivering the message. A common observation of this is that on a cluster server we are using the physical machine IP as our source IP, not any of the virtual IP addresses.
Exchange Server 2007, with its shiny new transport stack (freshly divorced from IIS' SMTP service), makes this quite clear. Receive Connectors, somewhat comparable to the SMTP Virtual Server in previous versions, are for receiving inbound mail. Send Connectors are for sending outbound mail.

When creating or modifying a Send Connector using the shell, you can specify the SourceIPAddress parameter to configure it to use a particular IP address for outbound mail. The IP address can be any IP address bound to a NIC on the Edge Transport server that is configured as a source server on the Send Connector. To modify an existing Send Connector, using the following command:

Set-SendConnector "ToInternet" -SourceIPAddress 1.2.3.4

However, as noted in the documentation, this only works on Edge Transport servers. Hub Transport servers ignore the SourceIPAddress parameter.

Labels: , , ,