• 1. London, UK
  • 2. New York, NY
  • 3. Sydney, Australia
  • 4. Melbourne, Australia
  • 5. Moscow, Russia
  • 6. Singapore
  • 7. Paris, France
  • 8. Chicago, IL
  • 9. Hong Kong
  • 10. Houston, TX
Bharat Suneja

Saturday, April 25, 2009

Earlier yesterday, Paul Thurrott and Rafael Rivera revealed a secret new feature in Windows 7— Windows XP Mode (XPM). XPM allows you to run Windows XP in a virtualized session, and includes a license for Windows XP SP3. As Thurrott & Rivera's blog post says:
Windows XP Mode dramatically changes the compatibility story for Windows 7 and, we believe, has serious implications for Windows development going forward.
Interestingly, XPM does not require you to run a separate desktop with Windows XP. Applications installed in the virtual environment are published to the Windows 7 host and shortcuts placed in the host's Start menu. Users can run Windows XP applications (installed in XPM) directly and transparently in Windows 7 desktop!

All I can say is— this is super cool! And although I haven't had a chance to try it out yet, it seems application compatibility is quickly headed to be a non-issue with Windows 7.

More details in Secret No More: Revealing Windows XP Mode for Windows 7 on Thurrott's SuperSite for Windows, and screenshots in Windows XP Mode for Windows 7 Screens.

Scott Woodgate confirmed it later in Coming Soon: Windows XP Mode and Windows Virtual PC on the Windows Blog.

Labels: , ,

Wednesday, April 22, 2009

If you have Microsoft Outlook 2007 installed on Windows Server 2008 (perhaps because you're also using a lab server as your workstation, or require Outlook for testing), when you start Outlook it complains about Windows Search service not being installed and that Outlook cannot provide fast search results when using the Instant Search feature.
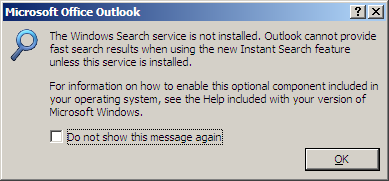

Figure 1: Microsoft Outlook 2007 prompt indicating Windows Search service is not installed

Outlook also displays a clickable notification under the Instant Search box.
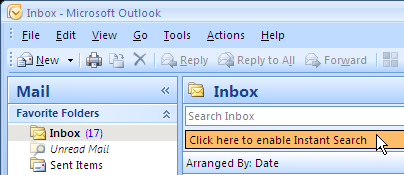

Figure 2: Microsoft Outlook 2007 notification to enable Instant Search

Clicking on the notification brings up the same dialog box shown in Figure 1.

In Online mode, Outlook 2007 uses Exchange Search for searching the mailbox - the mailbox is not cached locally.

In Cached Mode, it uses Windows Search service to index messages in the cached copy of your mailbox. Windows Vista includes Windows Desktop Search (WDS) out-of-the-box. Windows Server 2008 and Windows XP do not.

Of course, you can disable the prompt to enable Instant Search in Outlook by going to Tools | Options | Other tab | Advanced Options, and unchecking Show prompts to enable Instant Search. But if you live in a high-volume email environment and have a fairly large mailbox to show for it, Search is an invaluable tool!
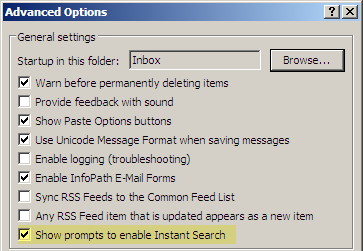

Figure 3: Disabling the prompt to enable Instant Search in Outlook 2007

Install Windows Search service
To install the Windows Search service on Windows Server 2008, use the following command:

ServerManagerCmd -i FS-Search-Service

Or install it using the Server Manager console using the following procedure:
  1. Start Server Manager
  2. Click Roles in the navigation tree on the left
  3. Select Add Role in the Roles Summary section
  4. Select the File Services role and click next
  5. Select the Windows Search role service
After Windows Search is installed, when you click the notification in Outlook, it acknowledges Windows Desktop Search has been installed, and prompts you to restart Outlook to enable Instant Search.

Meanwhile, Windows Search indexes your email and documents in the background. If you use Instant Search before indexing is complete, it returns results from the messages it has already indexed, and notifies you of number of items still to be indexed.

Windows Search 4.0 is the more current version of Windows Search. Download: x64 | x86 .

Labels: , ,

Wednesday, April 15, 2009


Released: Exchange 2010 Beta

Posted by Bharat Suneja at 6:00 AM
The word is out— the product hitherto known as E14 has hit the streets as Exchange 2010 beta! Download it here (Note: 64-bit only).

As Exchange CVP Rajesh Jha points out on the Exchange team blog (read 'Presenting Exchange 2010'), the latest and greatest version of Exchange Server is built from the ground up with Software + Services in mind, and is already being used by 5 million Outlook Live users! In case you missed it, Outlook Live is the free email service available to universities, formerly known as Exchange Labs.

The reviews are already pouring in:

Labels: , ,

Thursday, April 09, 2009

You've installed SSL certificates on previous versions of IIS more times than you care to remember. It's no rocket science - you create a certificate request, request the certificate from a Certification Authority, get the certificate and complete your certificate request.

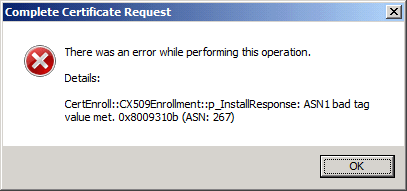
Then there's IIS 7. Modularized. Optimized. Secure. You follow the same procedure as you did with previous versions of IIS. Create a certificate request, check. Get the certificate from a CA, check. Install the certificate, and that's where the familiarity ends. Instead of installing the certificate, IIS 7 throws up a cryptic error: There was an error while performing this operation. Details: CertEnroll::CX509Encrollment::p_InstallResponse: ASN1 bad tag value met. 0x8009310b (ASN: 267).

Screenshot: Error installing SSL certificate on IIS 7
Figure 1: IIS 7's cryptic error when trying to install an SSL certificate

If you fire up the Certificates console (start a new MMC console | add Certificates snap-in | select the computer account), you'll see the certificate is indeed installed.

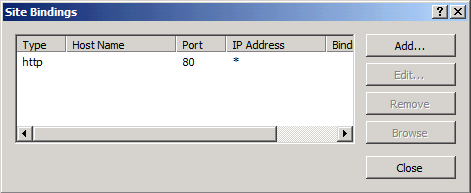
By default, IIS does not create a binding for HTTPS.


Figure 2: IIS 7's default site bindings

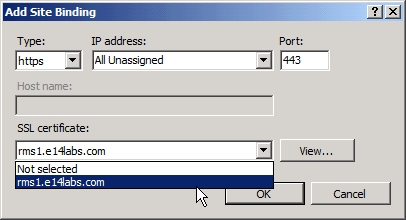
Add a binding for HTTPS
  1. In the Site Bindings window, click Add
  2. In the Add Site Binding window, select https from the Type: drop-down.
  3. Select an IP address (or optionally, leave All Unassigned selected if you want the site to bind to the specified SSL port on all IP addresses
  4. From the SSL certificate: drop-down, select the certificate you want to use for the binding/web site.

    [Optional] You can click the View button to view the certificate and ensure you're selecting the right one.

    Figure 3: Creating a binding for https in IIS 7
  5. Click OK to close the Add Site Binding window.

Close the Site Bindings, start a browser, and test the web site using https.

Labels: , , ,