
Exchange Server and Exchange Online allow your users to automatically forward email to an external email address. Over the years, I’ve written about forwarding email to an external email address in Exchange, the risks of forwarding work email to personal email accounts and listing users with email forwarding enabled.
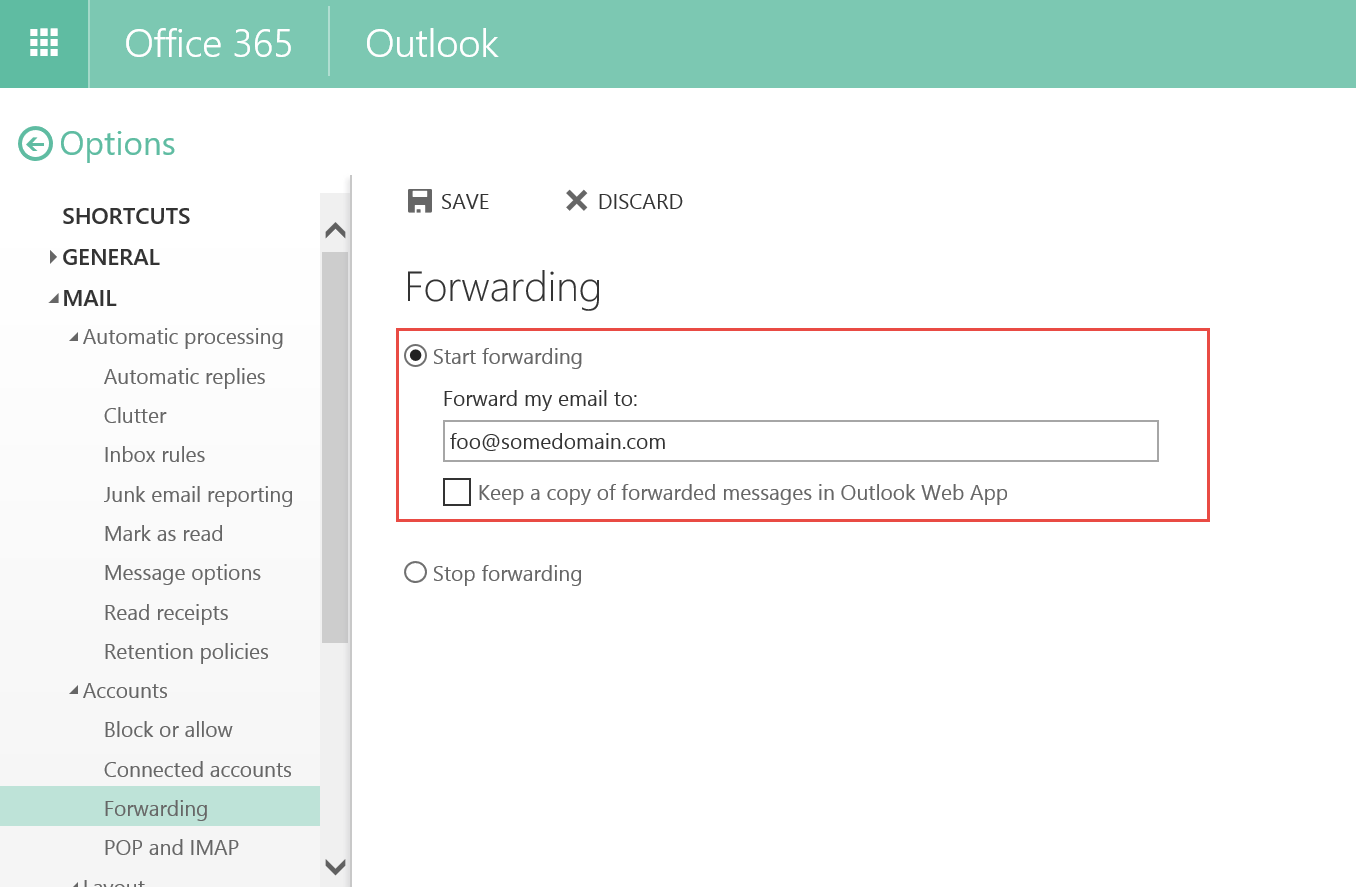
Figure 1: Automatic email forwarding options in Outlook Web App in Exchange Server and Exchange Online
Allowing users to automatically forward mail to an external email address brings the risk of information leakage. Additionally, users can select the option to not keep a copy of the message in the mailbox. If the message does not get delivered to a mailbox at all, it can’t be archived and won’t be available for eDiscovery. This is by design. However, it’s important to note that this may result in your organization being out of compliance and you should change the settings in your Exchange organization, as explained below, to prevent this from occurring.
If messages are never delivered to a mailbox, they can’t be archived and won’t be available for eDiscovery.
You can capture messages in the transport pipeline by using Journaling, which creates a copy of the message and delivers it with a Journal report to a journaling mailbox (or more appropriately, a journaling recipient). The merits and demerits of using Journaling v/s In-Place Archiving, In-Place Hold and Litigation Hold make for interesting conversation but are beyond the scope of this article.
Update 08/13/2015: Microsoft has now added functionality to archive auto-forwarded messages for users on Hold. See Archiving auto-forwarded messages in Exchange Online and Exchange Server.
For now, let’s find out how to disable automatic email forwarding in Exchange Online and Exchange Server.
Role-Based Access Control (RBAC) puts you in control
Exchange Server and Exchange Online provide you great granular control over what your users can and cannot do using Role-Based Access Control.
Brief RBAC 101: Exchange controls the settings a user can change using a Management Role Assignment Policy. A Role Assignment Policy consists of a number of Management Roles and a Management Role contains Management Role Entries – the basic building block that defines each Exchange cmdlet and the parameters of the cmdlet that a user can use. You can think of the Management Role Entry as the equivalent of file level NTFS permission (aka an Access Control Entry or ACE) that applies to Exchange cmdlets and parameters. Of course, most users will never learn of this complexity as they change their settings using the UX in OWA (and Outlook).
The default Role Assignment Policy assigned to users is the Default Role Assignment Policy. If you look at the Permissions slab in the EAC, you can change the individual roles included in the policy, but you can’t change the individual cmdlets and parameters that each role provides. What this means is that you can’t specifically disable forwarding-related parameters using the EAC.
Remove email forwarding parameters from the Default Role Assignment Policy
The following forwarding-related parameters of a mailbox are configured using the Set-Mailbox cmdlet:
- DeliverToMailboxAndForward
- ForwardingAddress
- ForwardingSmtpAddress
Let’s find out which Management Roles include these parameters of Set-Mailbox:
Get-ManagementRole -cmdlet Set-Mailbox -CmdletParameters ForwardingSmtpAddress
This returns a list of 3 Management Roles:
| Name | RoleType |
| —- | ——– |
| Mail Recipients | MailRecipients |
| User Options | UserOptions |
| MyBaseOptions | MyBaseOptions |
Out of the three roles, the Default Role Assignment Policy includes the MyBaseOptions role. You can’t modify the default MyBaseOptions role. But you can create a new Management Role (e.g. MyBaseOptions-NoForwarding) based on the MyBaseOptions role and then modify the Default Role Assignment Policy to replace MyBaseOptions with the new role.
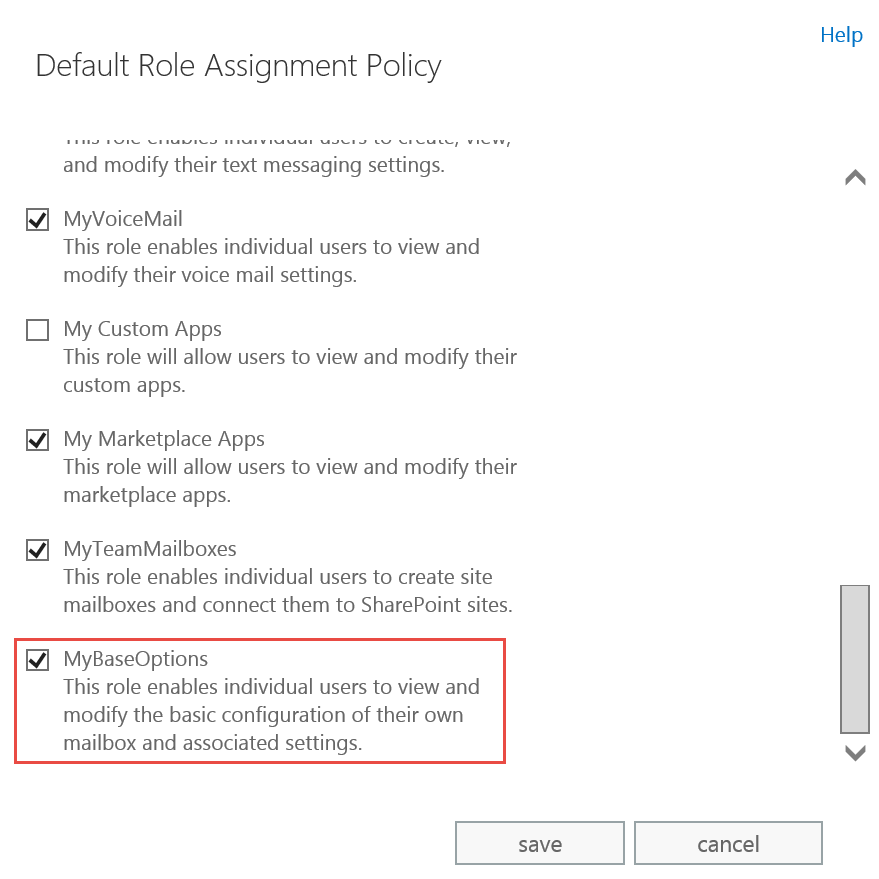
Figure 2: The MyBaseOptions management role in the Default Role Assignment Policy allows users to set up automatic email forwarding
1. Create a new management role based on the MyBaseOptions role
This command creates a new Management Role called MyBaseOptions-NoForwarding based on the MyBaseOptions role.
New-ManagementRole MyBaseOptions-NoForwarding -Parent MyBaseOptions
2. Remove the forwarding-related parameters from the MyBaseOptions-NoFowarding role
This command removes the forwarding-related parameters from the new MyBaseOptions-NoForwarding role.
Set-ManagementRoleEntry MyBaseOptions-NoForwarding\Set-Mailbox -RemoveParameter -Parameters DeliverToMailboxAndForward,ForwardingAddress,ForwardingSmtpAddress
PowerShell Tip: List parameters included in a management role entry
A management role has entries for each cmdlet and its parameters that someone who’s assigned the role is allowed to use. Use this command to list the parameters of a cmdlet included in a management role entry:
(Get-ManagementRoleEntry <ManagementRoleName>\<CmdletName>).parameters
This command retrieves all parameters of Set-Mailbox cmdlet included in role entries in the MyBaseOptions-NoForwarding role:
(Get-ManagementRoleEntry MyBaseOptions-NoForwarding\Set-Mailbox).parameters
3. Replace the MyBaseOptions role in Default Role Assignment Policy with MyBaseOptions-NoForwarding
If you want to disable automatic email forwarding for all users in your organizations, you should modify the Default Role Assignment Policy to replace the default MyBaseOptions role with the new MyBaseOptions-NoForwarding role you created. You can do this easily using the EAC:
- In the EAC, go to Permissions > User Roles and edit the Default Role Assignment Policy
- You’ll notice that both the MyBaseOptions and the new role MyBaseOptions-NoForwarding are selected. Clear MyBaseOptions and then select MyBaseOptions-NoForwarding.
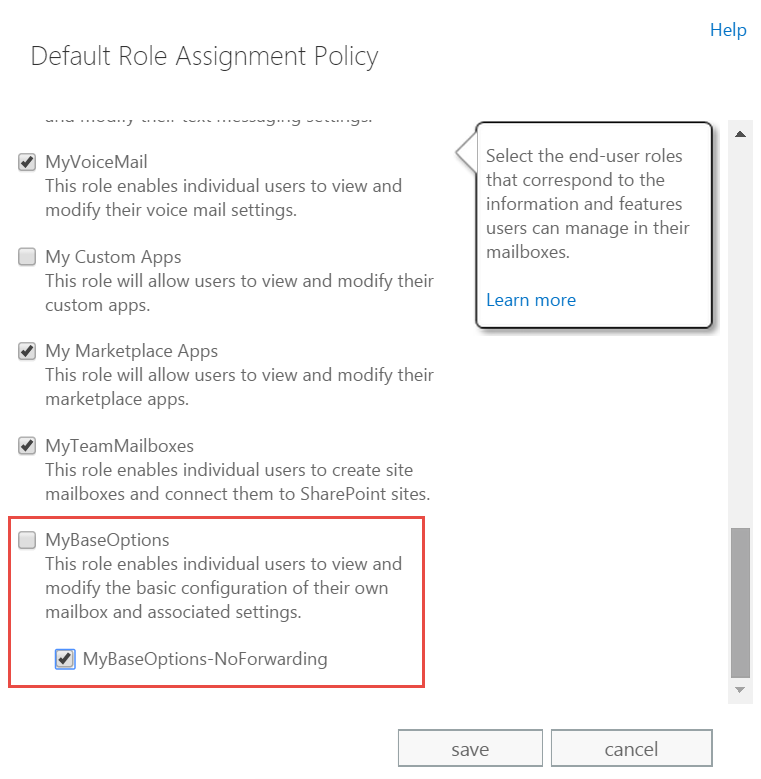
Figure 3: Unchek MyBaseOptions and then check MyBaseOptions-NoForwarding
It takes some time for the policy to refresh. Now if the users go to User Options in OWA, they won’t see the Forwarding options.
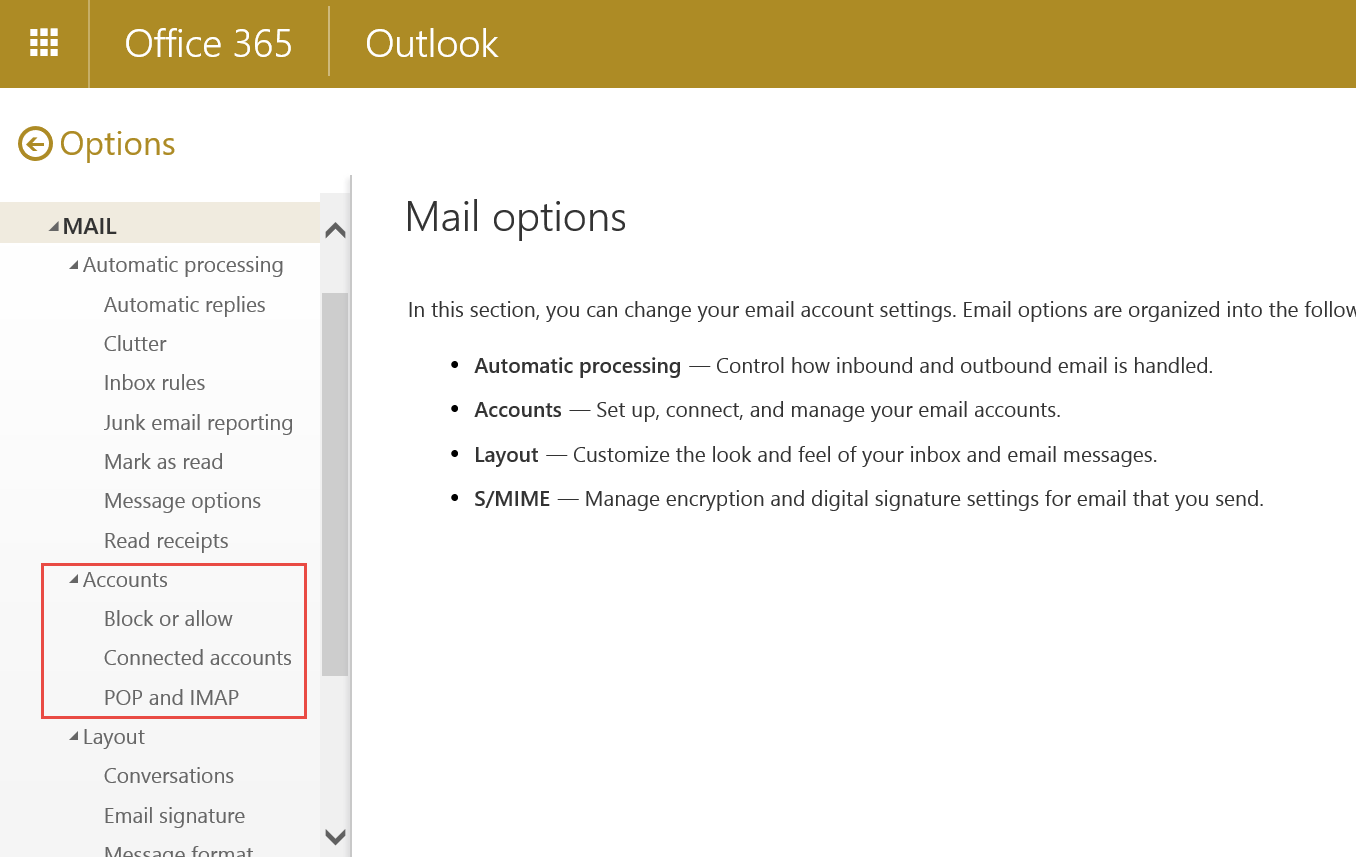
Figure 4: No email forwarding options in Outlook Web App in Exchange Server and Exchange Online
Remove automatic email forwarding for users who’ve already set it up
Modifying the Default Role Assignment Policy or creating and applying a new role assignment policy prevents users from setting up automatic email forwarding in the future. You’ll also need to check and disable automatic forwarding for users who may have already set it up.
- Use this command to list users who have set up automatic email forwarding to an external address:
Get-Mailbox -Filter {Name -notlike “DiscoverySearchMailbox*” -and ForwardingSmtpAddress -ne $null}
| ft name,*forward* -autoUpdate 9/27/2017: While testing the command again in response to a comment, I noticed there are two forwarding-related parameters. More in Set-Mailbox cmdlet help for details.- ForwardingAddress, which is used to specify a recipient inside your organization, and
- ForwardingSmtpAddress, used to specify the SMTP address of a recipient who’s typically outside the organization.
To list both internal and external forwarding recipients, use this updated command:
Get-Mailbox -Filter {Name -notlike “DiscoverySearchMailbox*” -and (ForwardingSmtpAddress -ne $null -or ForwardingAddress -ne $null)} | ft name,*forward* -auto
- Inspect the list of mailboxes returned and the email addresses they forward to.
Use this command to remove automatic email forwarding to external recipients:
Get-Mailbox -Filter {Name -notlike “DiscoverySearchMailbox*” -and ForwardingSmtpAddress -ne $null}
| Set-Mailbox -ForwardingSmtpAddress $nullUse this command to remove automatic email forwarding to internal and external recipients:
Get-Mailbox -Filter {Name -notlike “DiscoverySearchMailbox*” -and (ForwardingSmtpAddress -ne $null -or ForwardingAddress -ne $null)}
| Set-Mailbox -ForwardingSmtpAddress $null -ForwardingAddress $null
Disable automatic email forwarding using Inbox rules
Removing forwarding options and disabling existing auto-forwarding settings prevents server-side automatic forwarding. But your users may still be able to use mechanisms such as Inbox Rules in Outlook and OWA or other email clients to automatically forward email to external users. To disable client-side automatic email forwarding outside your organization, you must configure Remote Domain settings.
Use the EAC to disable automatic email forwarding to external domains
- In the EAC, go to Mailflow > Remote Domains
- Select the remote domains for which you want to disable automatic email forwarding. Settings for the Default remote domain (the * namespace) apply to all external domains. If you want to allow automatic email forwarding to specific domains, you can create new Remote Domains.
- In Default remote domain settings, clear Allow automatic forwarding.
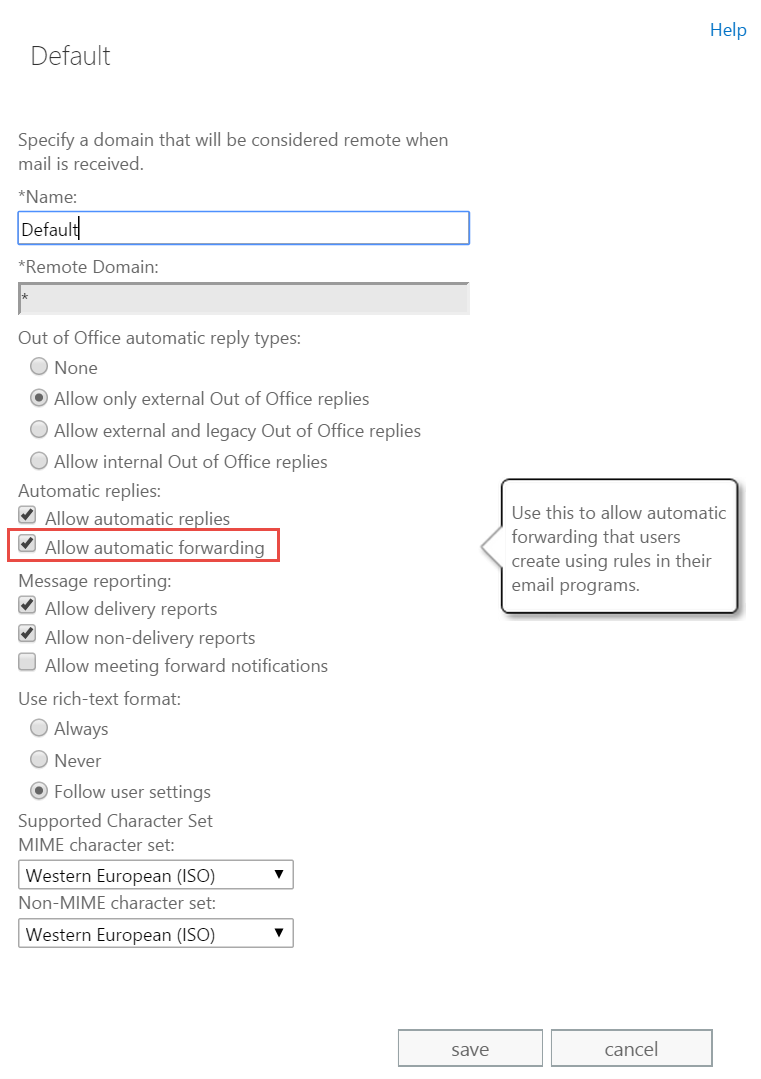
Figure 5: Configure Remote Domain settings to disable automatic email forwarding from the client
Or use this PowerShell command:
Set-RemoteDomain Default -AutoForwardEnabled $false
Exchange Server and Exchange Online provide provide you the means to apply granular controls via RBAC and Role Assignment Policies. Use PowerShell to quickly get reporting data and change settings for large number of users.
[…] Disable automatic email forwarding in Office 365 and Exchange Server […]
How to remove the role’s management role assignments.
I read the whole article and was like, what a process! We’ll need to consider the impact of users not being able to forward at all.
Does removing the attributes from the New Role also disable the ability to forward to both internal and external addresses?
“Or just use this Powershell Command”. I nearly died laughing at that.
[…] One of the common asks for Hold has been the ability to capture messages automatically forwarded by users or admins, where a copy of the message is not stored in the user’s mailbox. For organizations wanting to stay in compliance, the recommendation has been to disable automatic forwarding completely. See Disable automatic email forwarding in Office 365 and Exchange Server. […]
What I’m looking for is the next step, which would say [email protected] cannot forward, but [email protected] can.
Jason I think you may can create a Role Management Scope to which the Role Entry will Apply to and then granularly control who belongs groups/users who are part of each scope of policy application.
How long it takes the settings to apply?
Implemented the change 30mins ago, logged out and back in and the Forwarding option is still there.
Did you ever get it to work Frank?.
Yes Magnus it worked.
I was logging as an admin hence the option was still there.
When I logged on as an user I noticed the option disappeared.
Thanks a lot!, my issues was exactly the same!
Thank you for the article, It works for non-admin user which is great and how can I bring back to what it was before? I mean how can I remove the MyBaseOptions-NoForwarding from the MyBaseOptions?
Remove-RemoteDomain Default -AutoForwardEnabled $false
You can either run: Remove-ManagementRole “MyBaseOptions-NoForwarding” as per: https://technet.microsoft.com/en-us/library/dd351170(v=exchg.160).aspx
But I recommend you leave it there and just check the parent MyBaseOptions. This will allow you to play with the role in the feature and simply disable its effects.
I can’t seem to get the query to identify users with forwards to work.
Get-Mailbox -Filter {Name -notlike “DiscoverySearchMailbox*” -and ForwardingSmtpAddress -ne $null} | ft name,*forward* -auto
This results in;
Cannot bind parameter ‘Filter’ to the target. Exception setting “Filter”: “Invalid filter syntax. For a description of the filter parameter syntax see the command help.
“Name -notlike “DiscoverySearchMailbox*” -and ForwardingSmtpAddress -ne $null” at position 16.”
Works for me. However, while testing this, I notice there are two Forwarding* parameters – 1) ForwardingAddress (typically specifies recipient in the same org) and 2) ForwardingSmtpAddress (typically external SMTP address). So updated query to list all recipients should be:
Get-Mailbox -Filter {Name -notlike “DiscoverySearchMailbox*” -and (ForwardingSmtpAddress -ne $null -or ForwardingAddress -ne $null)} | ft name,*forward* -auto
get-mailbox * | select-object WindowsEmailAddress, ForwardingSMTPAddress | export-csv c:\forwarding.csv
The reason he got that error, which I got too initially, is because a copy/paste from this blog can easily give you “fancy” (high-order ASCII) quotes, and PowerShell, unfortunately, chokes on them.
Manually type in the quotes in the command or correct them in a text editor before pasting.
Thanks for the comment on the “fancy” quotes. Yeah, I replaced it with normal quotes and it worked.
Hey,
Remove the curly brackets between the DiscoverySearchMailbox and replace with single quote. It should look like;
Get-Mailbox -Filter {Name -notlike ‘DiscoverySearchMailbox*’ -and ForwardingSmtpAddress -ne $null} | ft name,*forward* -auto
Excellent and useful information, thanks for this.
Thanks Bharat for this excellent article!
I had a question regarding the use of default Remote Domains settings and setting to clear Allow automatic forwarding, will this not have an impact on Out of Office (OOF) messages being sent to external domains?
No. Automatic forwarding is different than automatic replies (OOFs).
Hello,
Great guide, a note, you can also add it on a per user basis also if you need to. We have a single contact for the company who has forward (C level) but we are blocking it for everyone else.
https://blogs.technet.microsoft.com/educloud/2012/07/05/turning-off-forwarding-in-exchange-online/
Great article but I after disabling Remote Domains using the default domain, it effectively stops forwarding that has been set up in office 365 as well however the article suggests only mailbox rules. If this is the case all the other configurations seem to be pointless if this is all you want to do. Also, I’m looking to block everyone with the option to allow exceptions and this setting seems to be an all or nothing rule.
I too have noticed that the last step, in Remote Domains stopped all forwarding. That was not wanted. We still wanted a handful of people to be allowed to forward.
How can I allow a few people to forward?
Hi Bhuarat, following your intro here, I also figured out how to stop inbox rules from forwarding in owa.
Set-ManagementRoleEntry MyBaseOptions-NoForwarding\New-InboxRule -RemoveParameter -Parameters ForwardTo,RedirectTo,ForwardAsAnAttachment
Awesome!
Out of interest, will using the two powershell scripts to remove current forwarding and prevent future forwarding by users also remove admin-placed forwarding direct from the admin center?
For example: I have a couple of internal email addresses which are intentionally forwarded to other internal email addresses. I want these to stay in place. They were set inside the admin center. I also want to be able to create more of these in future through the admin center. Will using the powershell script to remove current forwarding remove these as well? Will the prevent-forwarding script also prevent forwarding directly from the admin center?
That should be easy to circumvent – dump users with forwarding addresses as shown in the post and then reconfigure the ones that the admin wants to.
I attempted to use the Default Role Assignment policy steps provided here. However the Forwarding option remains for OWA users. I got a Microsoft engineer on the phone and they informed me that Forwarding options can no longer be removed using these steps, or any method for that matter.
Is this still working for anyone else?
This works to remove the Forwarding menu from OWA, however it does NOT stop users/hackers from creating auto-forwarding ‘rules’.
@Matthew (February 4, 2020 at 4:01 pm)
To stop Outlook Client auto-forwarding rules to external this can be done by Mail flow rules.
Thanks