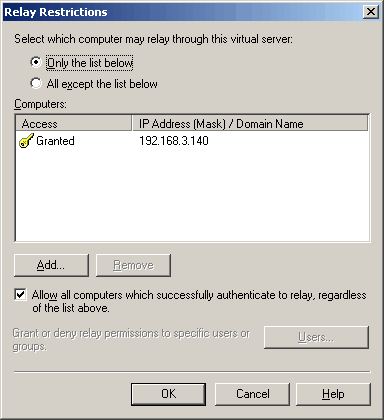
In Exchange Server 2003, you can allow anonymous SMTP hosts to relay mail by adding their IP address(es) in SMTP Virtual Server Properties | Access tab | Relay. Hosts that require anonymous relay capability include application servers and devices such as copiers, which scan documents and send them as email attachments.

Figure 1: Controlling relay restrictions in Exchange Server 2003
Starting with Exchange Server 2007, Exchange implemented its own SMTP protocol stack – unlike Exchange Server 2003/2000, you no longer need to install the SMTP service from IIS. SMTP Virtual Servers have been replaced by Receive Connectors. Understandably, the way you allow relaying has changed as well.
Do you really need to allow relaying?
Before you setup anonymous relaying, it’s important to understand the need for relaying. If your application servers or devices like copiers need to send mail only to internal recipients – i.e. mail to addresses for which Exchange has an Accepted Domain (or a Recipient Policy in Exchange Server 2003/2000) and therefore will receive inbound mail for, it is not considered relaying. The application server or device should be able to do this without any configuration on Exchange.
Recipient Policies and Exchange Server 2010/2007
In Exchange 2003, Recipient Policies tell Exchange which domains to receive inbound email for, and to generate email addresses for recipients using those domains. Exchange 2007 splits this functionality into two parts:
- Accepted Domains: As the name suggests, Accepted Domain tells Exchange which domain to accept inbound email for
- Email Address Policies which actually generate the email addresses
In Exchange Server 2003/2000, you use Active Directory Users & Computers (ADUC) to create recipients such as user accounts and distribution groups. Exchange’s Recipient Update Service (RUS) monitors Active Directory for new recipients or changes to existing recipients and applies Recipient Policies.
In Exchange 2007 and later, there’s no RUS (or its role is significantly minimized that it’s safe to say there’s no RUS). Recipients are provisioned in Exchange using the Exchange Management Console (EMC) or the Exchange Management Shell (EMS) and Email Address Policies are applied in real-time.
Just like previous versions, Exchange 2010/2007 allow authenticated relaying by default. So if your application server or device can authenticate, you must look at configuring them to do so and avoid allowing anonymous relaying. However, some applications or devices may not be able to authenticate. You may need to allow anonymous relaying when the application server or device receives the SMTP error message:
550 5.7.1 Unable to relay
Relaying: The easy way, and the secure way
The best way to allow unauthenticated relaying, or certainly the more secure and recommended one, is to create or use a Receive Connector dedicated for this purpose. I recommended this approach even on Exchange Server 2003/2000 — it’s not a good idea to use your Internet-exposed SMTP virtual server to allow anonymous relaying, even if restricted to specified IP addresses.
Scott Landry wrote about this recently on the Exchange team blog in “Allowing application servers to relay off Exchange Server 2007“.
To create a new Receive Connector, you need another IP address on your Exchange server.
The other alternative is to create a new Receive Connector that listens on a different port instead of the default SMTP port (TCP port 25). Most app servers and devices don’t like this (which shouldn’t be a surprise, because these are coded by the same developers who decided against providing for authenticated SMTP) and many won’t let you configure an alternate port for sending SMTP mail. Rather than mess with non-default ports for SMTP, and having to configure all clients that need to submit to it to also use the same non-default port, it’s best to add another IP address to your Exchange server and create a new Receive Connector.
Receive Connector Bindings in Exchange 2010/2007
Server processes communicating using TCP/IP listen on a particular port number on a given network interface or IP address. This combination of IP address + port number is known as a socket or binding. Two processes can’t use the same socket at the same time— each needs to have a unique binding. In Exchange 2003, SMTP Virtual Servers bind to a socket, specified by a unique combination of IP address + port number. This means two SMTP Virtual Servers can’t bind to the same IP address + Port combination.
In Exchange 2010/2007, Receive Connectors also consider the RemoteIPRanges — the IP addresses or subnets that are allowed to connect to a Receive Connector, in addition to the IP address + port combination, as a unique binding. This means you can create more than one Receive Connectors using the same IP address + port combination, but different RemoteIPRanges. This allows you to enforce different settings for different SMTP hosts that connect to the same IP address + port. .
Allow relaying: The easy way
With the new IP address added to the Exchange server – let’s say it is 192.168.1.17, and your app server, device or copier that needs to relay is 192.168.1.100, fire up Exchange shell and use the following command:
New-ReceiveConnector -Name RelayConnector -usage Custom -Bindings ‘192.168.1.17:25’ -fqdn server.domain.com -RemoteIPRanges 192.168.1.100 -server MYEXCHANGESERVER -permissiongroups ExchangeServers -AuthMechanism ‘TLS, ExternalAuthoritative’
What this does:
- Creates a new Receive Connector called RelayConnector
- Specifies the usage type Custom
- Binds the Receive Connector to port 25 on IP address 192.168.1.17
- Gives it the FQDN of server.domain.com
- Allows only the host with the IP address 192.168.1.100 to connect to it (specified by the RemoteIPRanges parameter)
- Additionally, and most importantly, it assigns the ExchangeServers permission group to it, and disables authentication. When you select ExternalAuthoritative for authentication, you’re telling Exchange that you completely trust the IP address(es) or subnets specified in the RemoteIPRanges parameter (192.168.1.100) and you have another authentication mechanism outside of Exchange, such as IPSec, to authenticate.
This also bypasses all security for messages received from that IP address. Because Exchange treats all hosts specified in RemoteIPRanges as trusted, it doesn’t apply anti-spam filters, doesn’t enforce message size limits, resolves P2 headers, and allows sending on behalf of users. Going back to Exchange Server 2003, this is somewhat similar to adding the sending host’s address to Connection Filtering‘s Global Accept list.
A better, more secure way to allow relaying
If you want it to be more secure, you can create a Receive Connector with PermissionGroups set to AnonymousUsers:
New-ReceiveConnector -Name RelayConnector -usage Custom -Bindings ‘192.168.1.17:25’ -fqdn server.domain.com -RemoteIPRanges 192.168.1.100 -server MYEXCHANGESERVER -permissiongroups AnonymousUsers
Notice, we’ve left out the AuthMechanism parameter in the above command. However, we’re still restricting it to a particular IP address— 192.168.1.100. The big difference from the previous approach is we’re not treating the host as trusted.
Next, allow anonymous users to relay. This is done by allowing anonymous users the extended right ms-Exch-SMTP-Accept-Any-Recipient for this Connector:
Get-ReceiveConnector RelayConnector | Add-ADPermission -User “NT AUTHORITY\ANONYMOUS LOGON” -ExtendedRights “ms-Exch-SMTP-Accept-Any-Recipient”
Exchane 2010/2007 and the transport permissions model
In Exchange 2010/2007, you can assig granular permissions to security principals on Receive Connectors and Send Connectors. For instance, if you want to have messages from a certain sender bypass Exchange’s anti-spam filters, you can also assign the ms-Exch-Bypass-Anti-Spam permission to that sender on a Receive Connector. Note, however, that the sender’s identity can only be established if they’re authenticated. Mail from all unauthenticated senders, which includes most Internet mail, is considered as being received from Anonymous (permissions assigned to NT AUTHORITY\ANONYMOUS LOGON apply).
For more information about transport permissions in Exchange 2010, check out Understanding Receive Connectors and Understanding Send Connectors. For Exchange 2007, see “Exchange Server 2007 Transport Permissions Model” in Exchange Server 2007 documentation.
What’s the difference?
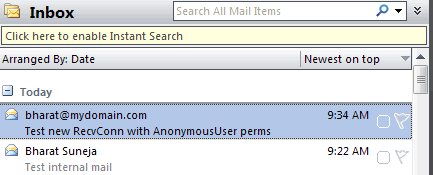
The difference between the 2 approaches can be seen when you send test messages, as shown in the following screenshot:

Figure 2:The difference between the 2 approaches can be seen in how messages are displayed in email clients
The first message at 9:22 AM is sent by the first Connector, where the message received without authentication actually shows up as sent by me – the P2 headers are resolved. (More about resolving anonymous senders in previous post: ” A Late New Year’s Resolution: Do Not Resolve Anonymous Senders“). Whereas the second message at 9:34 AM actually shows up with the sender’s SMTP address.
The second message also went through the anti-spam filters – a quick check of the message headers reveals the antispam headers.

Figure 3: Messages received using the second method do not bypass anti-spam filters by default

{ 6 comments… read them below or add one }
← Previous Comments
Thanks a lot for utilizing free time in order to publish “Exchangepedia | How To Allow Relaying in Exchange 2010 and
Exchange 2007”. Thank you so much once again ,Fredrick
Hmm is anyone else having problems with the images on this blog loading?
I’m trying to find out if its a problem on my end or if it’s the blog.
Any feed-back would be greatly appreciated.
No issues with image.
Dear Bharat Suneja,
Thanks for the very informative article, i followed the information as above and created a special connector with “external secure” options ticked on the on the connector, but 2 days later i was blacklisted by CBL and Uceprotect, my scenario is like this::
I have RHEL linux box which has a Java application that needs to send email thru my exchange 2010 sp1, now the relay is like this
RHEL–> Hub Exchange 2010 receive connector –> Edge exchange 2010 send connector —> forefront-TMG –> Internet.
But if i disable the recieve connector i created for the linux box, i get delisted from the Internet spam controllers.
Please Help.???
Regards
Benjamin Bvalani
MCSA.
Hi Benjamin,
Not sure why you’re getting listed by RBLs. If you’re assigning permission to relay, you must lock down by IP address (i.e. add Linux server’s IP address to the receive connector’s remote ip ranges) – and make sure your linux box is not spamming.
Hi Bharat,
thanks for the post. I have a question regarding my scenario.
I have web server ( not on domain) in DMZ with 192.168.3.x ip and my lan is 192.168.1.x ip.
my exchange is in lan. i want that website to act as a relay. when i telnet from webserver it can email from user@mydomain to user@mydomain but will fail to external domain. when i do telnet, i get unable to relay .
thanks for your help.
Labs
{ 1 trackback }